2. Creation of Savings Account
Oracle FLEXCUBE facilitates account opening from different sources. This chapter discusses and takes you through the available options, stages involved and account opening workflow. In the first section, the chapter briefs you on the process involved. The next section talks about the steps involved in detail.
This chapter contains the following topics:
- Section 2.1, "Account Creation Process"
- Section 2.2, "Lead Requests"
- Section 2.3, "Processing Requests through STP"
- Section 2.4, "Channel Workflow Chart"
- Section 2.5, "Stages for Request Received through Branch (BPEL)"
- Section 2.6, "Receive and Verify"
- Section 2.7, "Seek Approval for Missing Documents / Details"
- Section 2.8, "Modifying and Resubmit the Application"
- Section 2.9, "Input Details of Savings Account"
- Section 2.10, "Verify Details of Savings Account"
- Section 2.11, "Modify Details of Savings Account"
- Section 2.12, "KYC_R Review Info "
- Section 2.13, "Block Customer in the System"
- Section 2.14, "Notify Customer on Negative Status of KYC Checks"
- Section 2.15, "Modify Penny Credit Details"
- Section 2.16, "Validate Penny Credit Details"
- Section 2.17, "Create / Modify Customer Details in Oracle FLEXCUBE"
- Section 2.18, "Create Account"
- Section 2.19, "Store document reference in Oracle FLEXCUBE"
- Section 2.20, "Check Available Balance"
- Section 2.21, "Generate Cheque Book "
- Section 2.22, "Retrieve Pre-printed Cheque Book "
- Section 2.23, "Issue Debit Card"
- Section 2.24, "Generate Welcome / Thank You Letter"
- Section 2.25, "Notify the customer/prospect about the successful account opening with details"
- Section 2.26, "Deliver Account Kit to the Customer"
- Section 2.27, "Store Documents"
2.1 Account Creation Process
The process of creating a savings account begins with a bank receiving an account opening application and the related documents from a customer. A bank can receive this application either from a:
- Prospect – On receiving the request, customer is created in ‘Customer Maintenance’ screen and customer account is created at ‘Customer Maintenance’ screen. After the successful creation of customer and account, the prospect is informed about it. If the KYC check is not passed, then the application is rejected.
- Existing Customer – While opening an account for an existing customer, the bank checks KYC details, only if there are any changes in the existing KYC information of the customer. If the KYC check is not passed the application is rejected after blocking the existing accounts.
For a customer who passes the KYC check, the customer ID is created/ updated and the customer account is opened in the relevant system and the kit is dispatched
Prospect/customer can contact bank either through
- Channel – A request to open an account can be through any of
the following routes.
- Lead Request
Account opening through BPEL
- Lead
Account opening through standard account opening process
- Account opening request through STP
- Account opening request through BPEL
- Lead Request
- Branch – A request to open an account is through BPEL
After receiving a request, the bank verifies whether the details/documents required to process the request are available. If any documents are missing, then the bank will either decide to proceed after obtaining the missing details/documents or to process the request without waiting for the missing details/documents; however, with necessary approvals.
The following sections provide details on the process followed for Lead Maintenance and BPEL workflow.
2.2 Lead Requests
This section contains the following topics:
- Section 2.2.1, "Processing Lead Requests"
- Section 2.2.2, "Main Tab"
- Section 2.2.3, "Details Tab"
- Section 2.2.4, "Financial Tab"
- Section 2.2.5, "Requested Tab"
- Section 2.2.6, "Document Details"
- Section 2.2.7, "Processing and Validating Fields in Lead Maintenance"
- Section 2.2.8, "Processing Lead Requests"
- Section 2.2.9, "Lead Workflow Chart"
2.2.1 Processing Lead Requests
Lead requests received from a prospective customers are handled at Lead Maintenance level and the facility is available to external channels as a service. As mentioned earlier, for a lead record, customer and account are created directly through Customer Information and Customer Account Creation screens respectively or through BPEL workflow.
Lead requests from an existing customer are also handled a Lead Maintenance level. However, for a lead record for an existing customer, the requested account is created directly through Customer Account Creation screen or BPEL workflow.
You can maintain the details of a prospective/existing applicant, when the applicant initially approaches the bank to open an account. The system facilitates capturing of lead details through external channels as well.
The following details are captured as part of this maintenance:
- Prospective/existing customer’s personal and location details
- Prospective/existing customer’s employment details
- Lead life cycle management
You can invoke this screen by typing ‘ORDLEADM’ in the field at the top right corner of the Application tool bar and clicking the adjoining arrow button.

You can specify the following details in this screen:
Lead Id
Specify a unique identification for the prospective customer.
Description
Specify a suitable description for the prospective customer.
Request ID
The system displays the request identification of the request.
Channel
The system by default displays ‘FLEXCUBE’ as the channel. However, you can modify if needed. The adjoining option list displays a list of valid channels. Select the appropriate one.
Date of Request
Specify the date when the prospective customer enquired about the account. You can also select the date from the adjoining ‘Calendar’ icon.
Application Type
Select the application type as ‘CASA’ from the adjoining drop-down list.
Current Status
The system displays the current status of the lead.
New Status
Select the new status from the adjoining option list. It is mandatory to specify the reason if the current status is ‘Closed’, ‘Rejected’ or ‘Additional Document Required’.
After authorization, the new status becomes the current status of the lead.
Conversation ID
Specify the conversation ID, if conversation is originated before the lead record submission. The adjoining option list displays all valid conversation IDs. Select the appropriate one.
2.2.2 Main Tab
You can capture the following personal and geographical details related to a prospective customer:
Sequence Number
The system displays the sequence number.Type
Select the type of the customer from the drop-down list provided. The following options are available:
- Primary
- Co-Applicant
Existing
Check this box, if the lead applicant is an existing customer.
Local Branch
Select the local branch of an existing customer from the adjoining option list.
Customer No
Specify the customer, if the Customer is existing. The adjoining option list displays all valid customer numbers. Select the appropriate one. If the Customer is prospect, then the system generates the new customer ID, by default.
Default
Click on default button to default the details on existing customer.
Short Name
The system defaults the Short name when default button is pressed, if the applicant is an existing customer. However, you can specify the short name, if the applicant is prospect.
Customer Name
The system defaults the Customer name when default button is pressed, if the applicant is an existing customer. However, you can specify the customer name, if the applicant is prospect.
National ID
Specify the national Id or country code of the customer or select the national Id from the option list provided.
Responsibility
Select the responsibility from the adjoining drop down list.
Liability
Specify the liability for all parties other than primary applicant.
City
Specify the city of the customer.If the lead is received from the channel (FCDB), then the city value is passed by the FCDB to FCUBS and is defaulted here.
Country
Specify the country of domicile of the customer or select the country code from the option list provided.
Nationality
Specify the country of which the customer is a national or select the country code from the option list provided.
Language
Specify the primary language of the customer or select the language from the option list provided.
Customer Category
Specify the category to which the customer belongs or select the customer category from the option list that displays all valid customer categories.
Financial Currency
Select the financial currency from the adjoining option list.
Mobile Number
Specify the mobile phone number of the prospective customer.
Landline Number
Specify the land phone number of the prospective customer.
Specify the e-mail Id of the prospective customer.
Fax
Specify the fax number of the prospective customer.
Preferred Date of Contact
Specify the preferred date of contact.
Preferred Time of Contact
Specify the preferred time of contact.
First Name
Specify the first name of the customer.
Middle Name
Specify the middle name of the customer.
Last Name
Specify the last name of the customer.
Salutation
Select the salutation preference of the customer from the drop-down list provided. You can select any of the following options:
- Mr
- Mrs
- Miss
- Dr
Gender
Select the gender of the customer from the drop-down list.
Date of Birth
Specify the date of birth of the customer or select the date by clicking the ‘Calendar’ icon provided.
Mother’s Maiden Name
Specify the customer’s mother’s maiden name.
Marital Status
Select the marital status of the prospective customer from the drop-down list. The following options are available:
- Married
- Divorced
- Remarried
- Separated
- Spouse Expired
Dependants
Specify the number of dependants for the customer.
SSN
Specify applicant’s SSN.
Passport Number
Specify the passport number of the prospective customer.
Passport Issue Date
Specify the date on which the customer’s passport was issued or select the date from by clicking the adjoining ‘Calendar’ icon.
Passport Expiry Date
Specify the date on which the customer’s passport expires or select the date from by clicking the adjoining ‘Calendar’ icon.
Existing Relationship Details
You can maintain the following relationship details:
Relationship Type
Specify the relationship type of the customer.
Credit Card Number
Specify the credit card number of the customer
Customer ID/Account Number
Specify the customer identification or account number of the customer.
Note
The system defaults the above details for both the prospect and the existing customer, if the application is submitted from external system.
2.2.3 Details Tab
You can capture the address and employment related details of the prospective customer in ‘Details’ tab.
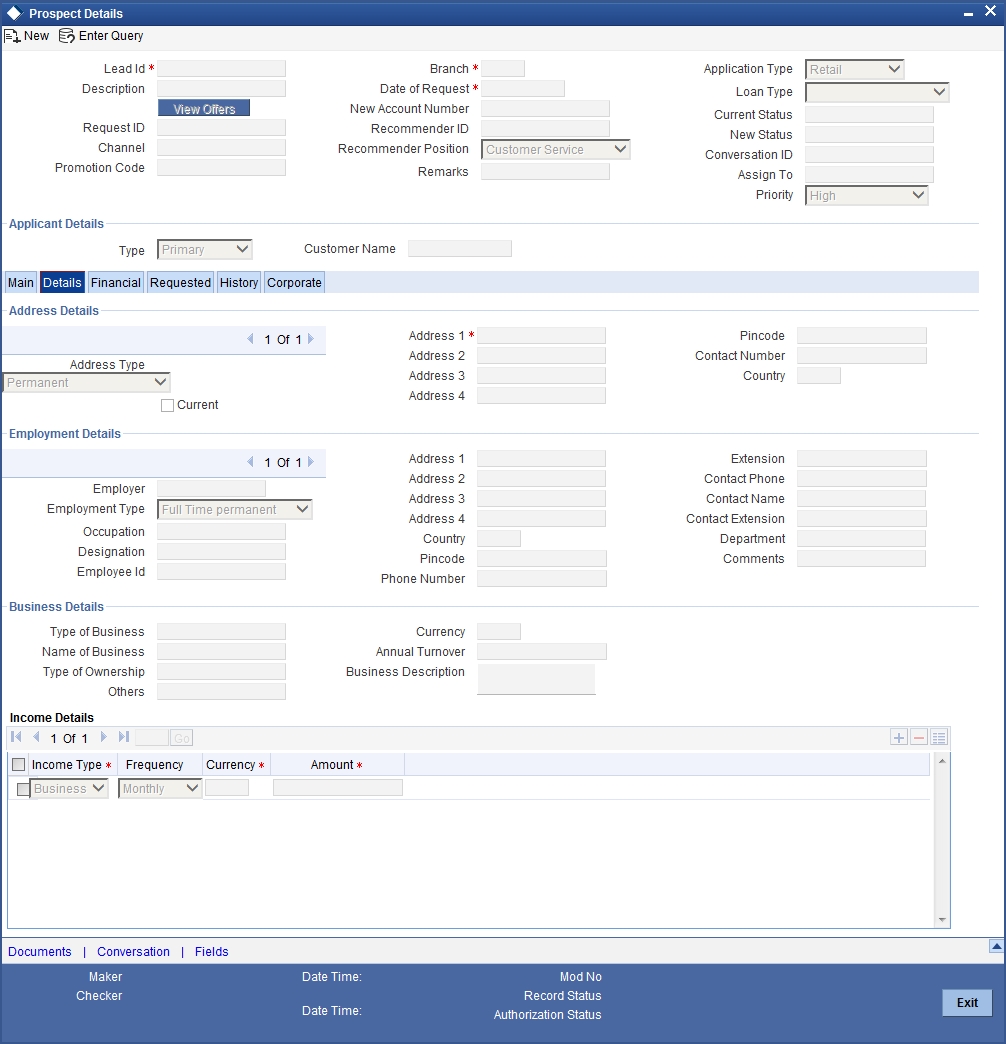
Address Details
Address Type
Select the address type of the customer from the following options provided in the drop-down list:
- Permanent
- Home
- Correspondence Address
Mailing
Check this box to indicate that the address you specify here is the customer’s mailing address.
Address Line 1 – 4
Specify the address of the customer in four lines starting from Address Line 1 to Address Line 3.
Pincode
Specify the zip code associated wit the address specified.
Contact Number
Specify the contact telephone number of the customer.
Country
Specify the country associated with the address specified.
Employment Details
Employer
Specify the name of the employer of the prospective customer.
Employment Type
Select the customer’s employment type from the drop-down provided. The following options are available:
- Part Time
- Full Time
- Contract Based
Occupation
Specify the occupation of the prospective customer.
Designation
Specify the designation of the prospective customer.
Employee Id
Specify the employee Id of the prospective customer.
Address Line 1 – 4
Specify the employment address of the customer in four lines starting from Address Line 1 to Address Line 4.
Country
Specify the country associated with the employment address specified.
Pincode
Specify the zip code associated with the office address specified.
Phone Number
Specify the official phone number of the prospective customer.
Extension
Specify the telephone extension number, if any, of the prospective customer.
Contact Phone
Specify the contact phone number of the customer’s contact person.
Contact Name
Specify the name of a contact person at the customer’s office.
Contact Extension
Specify the telephone extension number, if any, associated with contact person.
Department
Specify the department to which the customer belongs.
Comments
Specify comments, if any, related to the customer’s employment.
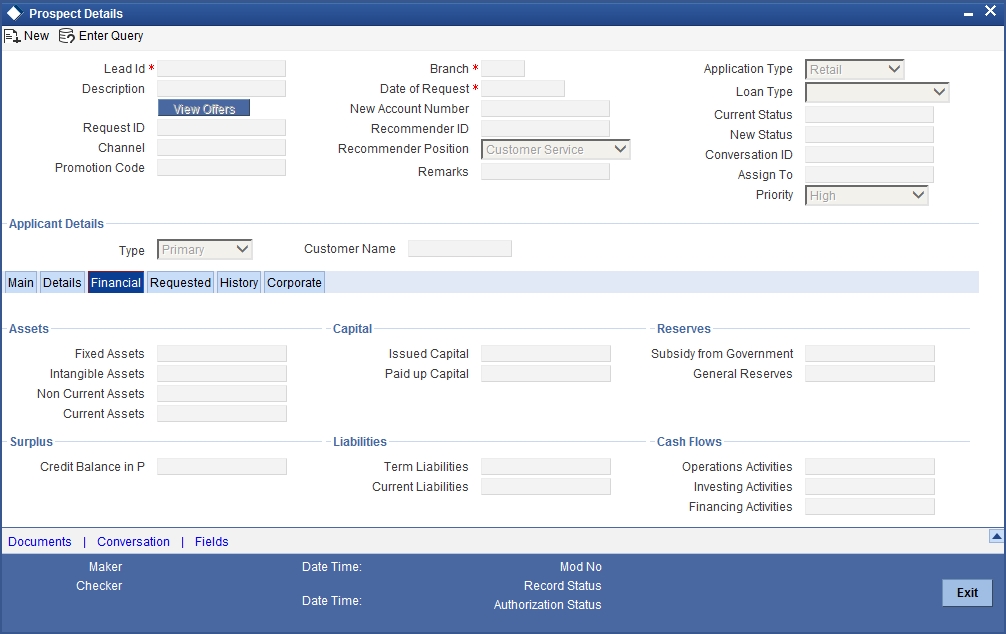
2.2.4 Financial Tab
You can capture the details related to the finance in the ‘Financial’ tab.
Income Details
Income Type
Select the income type from the adjoining option list.
Frequency
Select the frequency of the income of the applicant.
Currency
Select the currency of the income from the adjoining option list.
Amount
Specify the income amount.
2.2.5 Requested Tab
You can capture the details related to the requested CASA in ‘Requested’ tab.
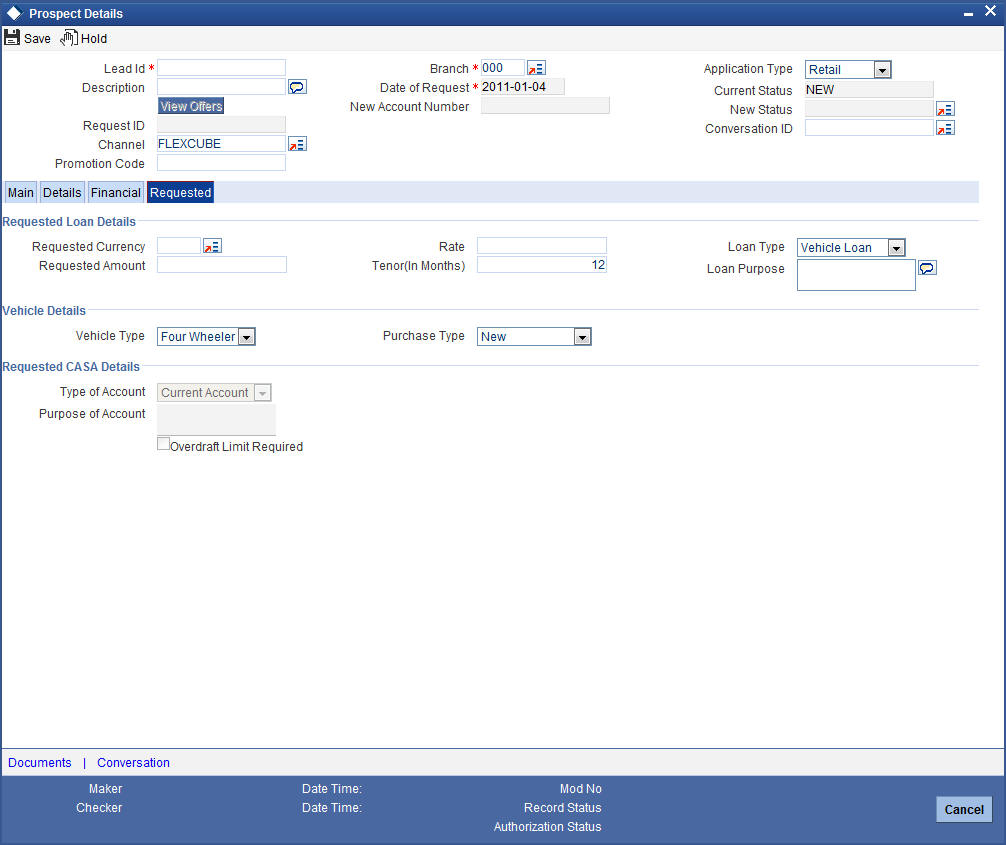
You can capture the following details here:
Requested CASA Details
Note
This section is applicable only for CASA Lead origination.
Type of Account
The system displays the type of account.
Purpose of Account
The system displays the purpose of the account.
Overdraft Limit Required
Check this box if overdraft limit is required.
2.2.6 Document Details
Click on ‘Documents’ link to invoke the Documents screen.You can upload the required documents from the external system.

Document Category
Select the document category from the adjoining option list.
Document Reference
Specify the document reference.
Document Type
Select the type of document from the adjoining option list.
Remarks
Specify remarks, if any.
Ratio Upload
Check this box to enable ratio upload.
Upload
Click on ‘Upload’ button to upload the document.
View
Click on ‘View’ button to view the uploaded document.
The document upload from the external system is allowed only when:
- the customer submits the account opening request from the external system
- the status in the Prospect Details screen is ‘Additional Documents Required’.
Note
The documents uploaded by the customer through the external system is stored in the Document Management System with a document reference number.
Status Related Process and Validation
The details of conditional listing of statuses required based on ‘Application Type’ and ‘Current Status’ combination in ‘Lead Maintenance’ screen are listed in the below table:
Application Type |
Process Code |
Current Status |
New Status Available |
New Status Selected |
CASA |
LEAD |
New (Default Status for a new record) |
Follow Up Rejected |
Follow Up Rejected |
|
|
|||
|
|
Follow Up |
Under Process Rejected |
Under Process Rejected |
|
|
|||
|
|
Under Process |
Additional Doc Required Account Opening in Progress Rejected |
Additional Doc Required |
|
|
|
|
Account Opening in Progress Rejected |
|
|
|||
|
|
Additional Doc Required |
Under Process Rejected |
Under Process Rejected |
|
|
|||
|
|
Account Opening in Progress (Further process is done manually) |
Converted Rejected |
Converted Rejected |
|
|
|||
|
|
Account Opening in Progress (Further process is done through origination) |
- |
Origination in Progress (Automatic) This status gets updated automatically once the lead ID is linked with Origination reference number. |
|
|
Origination in Progress |
- |
Converted (Automatic) Once the account is successfully opened in origination this status gets updated automatically |
|
|
Converted Rejected |
- - |
- - |
|
|
- The default ‘Current Status’ for a new lead record will be ‘New’. In the ‘New Status’ field, the system lists the status based on the ‘Application type’, ‘Process Code’ selected and ‘Current Status’ of the record. The system enables you to proceed only when the new status you selected is applicable with respect to the current status. Else, the system displays the error message as “The status XXXXX cannot be chosen when the current status is XXXXX”.
- The system communicates the status along with the reason code to respective channels for each status change. When the status is updated as ‘Rejected’ or ‘Converted’, you cannot amend the lead record.
- The status ‘Converted’ and the field ‘New Account
Number’ are updated in lead record as listed below:
- If the account is created through origination flow (BPEL flow). then the system updates the lead record status as ‘Origination in Progress’. Then the lead ID is linked with the origination application reference number. On further flow when the account is created The system updates the ‘New Account Number’ in the Lead Maintenance screen with the newly created account number and changes the status as ‘Converted’.
- Alternatively, you can manually update the status as ‘Converted’. While updating the status as ‘Converted’ you must update the newly created account number also. Else, the system will displays an error message as "New Account Number to be entered".
- If the process flow is terminated for any reason, then the system updates the lead status as ‘Rejected’.
- You can link the lead ID with origination only when the current status of the lead record is ‘Account Opening in Progress’. The ‘Lead ID’ field in the origination screen will display a list of lead records which has the status as ‘Account Opening in Progress’.
2.2.7 Processing and Validating Fields in Lead Maintenance
The following are the steps involved to create an account using ‘Lead Maintenance screen. This section also briefs you on the validations related to few fields.
- Documents uploaded in external channels are stored in Document Management System and a reference number is created in system using which you can view the uploaded documents.
- Once the field level requirements are maintained the status definition needs to be maintained for lead management. The following features available in the system facilitate the status definition maintenance for lead management:
- A process code ‘LEAD’ maintained is maintained in the ‘Process Code Maintenance’ screen.
- Status definition is maintained based on the ‘Application Type’
and ‘Process Code’ combination, maintained in Customer Maintenance
and Lead Maintenance screens respectively. The system displays the following
values for selection:
- New
- Follow up
- Under Process
- Additional Doc Required
- Account Opening in Progress
- Converted
- Rejected
- Origination in Progress
You can link different reason codes to status definition in the ‘Status Maintenance Screen’. Reason codes are linked based on the ‘Application Type’, ‘Process Code’ and ‘Status Definition’ combination. You can invoke this screen by typing ‘ORDSTRMT’ in the field at the top right corner of the Application tool bar and clicking the adjoining arrow button.

You can maintain the following details:
Branch
The system the current branch code here.
Application Type
Select the application type you need to link to the status definition, from the adjoining drop-down list. The list displays the following values:
- CASA
- Retail
When the Application Type is ‘CASA’ and Process Code is ‘LEAD’, then the ‘Status Definition’ field displays the status values maintained in the system; however you can specify the values additional to the ones displayed. These values are stored in the database.
Process Stages
Process Code
Specify a valid process code you need to link to the status definition. The adjoining option list displays all valid process codes for the application type selected. Select the appropriate one.
Description
System displays the description of the selected process code.
Status Definition
Status Definition
Specify a valid status definition you need to link. Also, the adjoining option list displays all valid status definition for the process codes selected. You can select the appropriate one.
Enable
Check this box to enable status usage for the application type or process code.
Reason Codes
Reason Code
Specify a valid reason code you need to link. The adjoining option list displays all valid error codes maintained as ‘I’ at ‘Error Message Maintenance’ level are displayed here. Select the appropriate one.
You can link multiple reason codes to a status definition in this screen. However, it is mandatory to link at least a single reason code. This linking is extended to origination process codes also
Description
System displays the description of the selected reason code.
Enable
Check this box to enable status usage for the application type or process code.
Interaction
- Interaction between branch user and channel user is established using the interaction module in ‘Lead Maintenance’ screen and the Conversation ID is referred to as Interaction ID. Interaction ID for a prospect is branch walk-in customer ID. If a branch walk-in customer is not available, then the system displays an error message as "Walk-in Customer not Available for the Branch".
The ‘Reason Code’ and ‘Remarks’ details are sent to the channel, along with the status communication for a particular stage.
- Before submitting the lead request, you can initiate the interaction from channels. In such scenario interaction will be assigned to ‘Help Desk’ initially and then at later stage when customer chooses the branch, the system automatically changes the assignee to ‘All Roles’ for the customer chosen branch. The system defaults the User/Role field of the interaction as ‘Role’.
Note
Channel will send the Conversation ID along with the Request ID/Lead ID to the system, if interaction was initiated before the lead request is submitted.
- If the interaction is not started in channels even after the lead request is submitted, the branch user can initiate the interaction at any stage using the ‘Conversation’ button. The generated Conversation ID along with the Request ID/Lead ID is sent to respective channels for further conversation. However, the ‘Conversation ID’ once updated cannot be amended.
Validating Lead Maintenance Fields
The system validates if;
- For the application type CASA, the default current status for a new record is ‘New’.
- Based on the application type and current status are the ‘New Status’ values listed.
- Based on the new status value selected, are the reason codes linked to that status displayed in reason code field.
- If employment type is ‘Self Employed’ or ‘Other’, then are the fields under ‘Business Details’ header enabled. For all the other options, fields under ‘Business Details’ must be disabled.
- For ‘Part time’, ‘Full time’ and ‘Contract Based’ employment type, are the following fields enabled. For any other employment type they are disabled.
- Occupation
- Designation
- Employee id
- The fields under ‘Requested CASA Details’ must be enabled only when ‘Application Type’ is CASA.
- Overdraft Limit Required field must be enabled only when ‘Type of Account’ is selected as ‘Savings Account’.
2.2.8 Processing Lead Requests
You can receive the lead request from customer or prospects. The possible scenarios and the behavior of CIF ID for each scenario are explained below.
Scenario 1:
A prospect not holding any relationship with the bank raises a request from channels.
- In Applicant Details section of Lead Maintenance screen, ‘Existing’ check box will be unchecked.
- A new CIF ID is allocated to the prospect and is displayed in Customer Number field of Applicant Details section in Lead Maintenance screen.
- Once the lead is converted and if the new account is opened through BPEL route then the allocated CIF ID can be used.
- Once the lead is converted and if the new account is opened through manual CIF creation, then while opening an account opening, the allocated CIF ID needs to be released once the status of the lead is updated as converted.
Scenario 2:
An existing customer with FCDB login credentials can apply for a new account by logging into net banking.
- In Applicant Details section of Lead Maintenance screen, ‘Existing’ check box will be checked by default.
- Customer ID provided by the customer in channels is validated in channels and is displayed in Customer Number field of Applicant Details section in Lead Maintenance screen.
Scenario 3:
An existing customer without FCDB login credentials can apply for a new account by providing the existing relationship details and FCPB does not validate existing data.
- In Applicant Details section of Lead Maintenance screen, ‘Existing’ check box will be checked by default.
- Walk in Customer ID is computed by default in Customer Number field of Applicant Details section in Lead Maintenance screen.
- When the branch employee amends the lead record of walk-in customer ID, the system will display an error as “Invalid CIF, cannot amend a lead record as existing customer and customer ID is walk in ID".
Scenario 4:
An existing customer applies for an account as a prospect from FCDB without providing any existing relationship details. This procedure is similar to scenario 1.
Note
When the current status of the lead record changes to ‘Rejected’, then the CIF IDs blocked for the Scenarios 1 and 4 are released automatically by the system, so that the blocked CIF IDs can be re used.
Once the Lead request is approved and converted. customer account is created through any of these;
- BPEL - Refer Section 2.5, "Stages for Request Received through Branch (BPEL)"
- Opening an account through normal process
2.2.8.1 Opening an Account through Normal Process
The account opening through normal process comprises of the following stages
- CASA lead request submitted from channels
- Receive and verify account opening form and other documents
- Store documents
- Seek approval for missing documents / details
- Modify and resubmit the application
- Input details of savings account
- Verify prospect / customer details
- Modify details of savings account
- Know Your Customer checks
- Block customer in the system on negative Status of KYC check
- Notify prospect / customer on negative status of KYC checks
- Create / Modify customer details in the system
- Create Customer and Customer Account, if the request is from prospect and Create Customer Account, if the request is from existing customer
- Check available balance
- Generate cheque book in the system
- Issue Debit Card
- Generate welcome / thanks letter in the system
- Notify the customer/prospect about the successful account opening with details
- Deliver account kit to customer
- Store documents
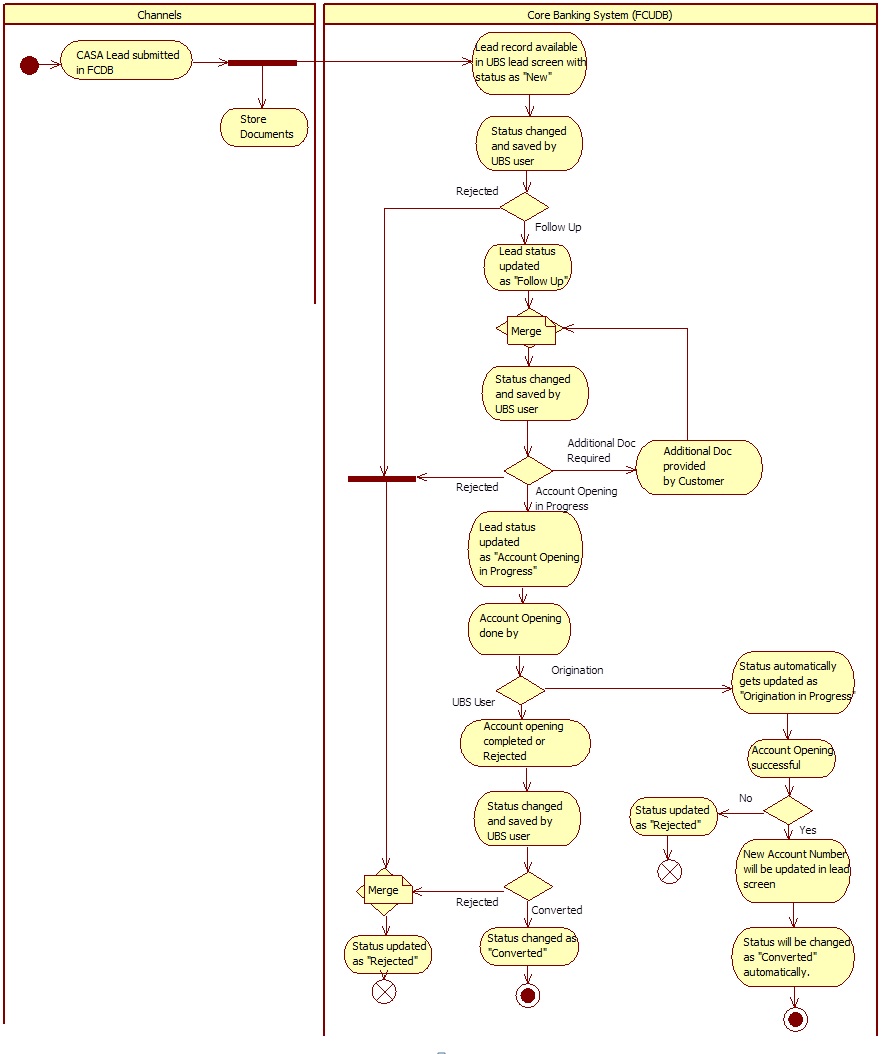
2.2.9 Lead Workflow Chart
The below flow chart provides graphical flow of the process followed for lead requests:
2.3 Processing Requests through STP
When a prospect or customer requests to open account through STP, the system processes the request online. While opening an account through STP, the system processes the following:
- ‘FCUBSCustomerService’ is consumed by channels for opening customer number and account number for a prospects and ‘FCUBSACCService’ will be consumed by channels for opening customer account for existing customers
- Required Customer/Customer Account details are captured for prospect and required Customer Account details are captured for existing customer
- If a request is raised for cheque book, then the respective check box is checked and the requested number of leaves are provided.
- If a request is raised for debit card, then the respective check box is checked and the details of name on card are collected.
- If a request is raised for joint account, then the respective check box is checked and the details of the joint holder are collected.
- After successful creation of customer and account for prospects and account for customers, the system commutes the respective details to channels.
Processing Requests for Cheque Book
If Cheque Book check box is checked by customer in channels, then the system;
- Stores the check book details in ‘Main’
‘Account Facilities’
‘Cheque Book’ check box of ‘Customer Account Maintenance’ screen
- Stores the ‘Number of Leaves’ details in ‘Cheque
Book Request’
‘Cheque Leaves’ field of ‘Customer Account Maintenance’ screen
You can identify these accounts for which cheque book is requested on a particular date using advance search facility in the account maintenance summary level.
- Processes cheque issuance manually
Processing Requests for Debit Card
If Debit Card check box is checked by customer in channels, then the system;
- Stores the debit card details in ‘Main’
‘Account Facilities’
‘ATM’ check box of ‘Customer Account Maintenance’ screen
- Stores the ‘Name on Card’ details in ‘Debit
Card Request’
‘Name on Card’ field of ‘Customer Account Maintenance’ screen
You can identify these accounts for which Debit Card is requested on a particular date using advance search facility under ‘ATM Card’ field at the Account Maintenance Summary level.
- Processes Debit Card issuance manually
Processing Requests for Joint Account Opening
The system also facilitates opening an account for joint owners. The below combinations are supported:
- Prospect (Primary) + Prospect (Secondary)
- Existing Customer (Primary) + Existing Customer (Secondary)
- Existing Customer (Primary) + Prospect (Secondary)
Apart from adding joint holders in the account, the system handles the other processes similar to online account opening process.
If there are any failures in account creation process through, then the system notifies the channels and rolls back the entire process. The channels will then send new requests for further processing. For prospects, if the customer creation is successful and there are any failures in account creation, then the system rolls the entire process. However, you cannot rollback the process, if the customer account is created.
For opening an account through STP, the channels take care of the following activities:
- KYC validation
- Penny Credit Validation
- Initial Funding
After successful completion of the process, the system communicates ‘Customer Number’ and ‘Account Number’ to channels.
Handling Penny Credit Requests from Prospects.
- For prospects, walk in customer ID is used to create a PC contract.
- While the PC contract is created for a prospect branch walk-in, customer ID will be chosen automatically in PC screen. The prospect name will be displayed in customer name field instead of branch walk-in customer name in PC screen.
- In the PC contract remarks application, reference number of the origination and the customer name must be captured.
- Required internal system parameters can be set up to identify the response of penny credit validation. i.e., Parameter like ‘Maximum number of days’ for rejection of payment can be set up internally to track the response. For example: if the maximum number of days is set as '3'. If a rejection is not received within these three days, then the transaction can be considered as successful. If there is any rejection received within 3 days, then the transaction will be considered as failure.
- When there is a rejection of penny credit transaction, the ‘Contract Status’ of PC contract gets updated as ‘Rejected’ and the ‘Reject Details’ will get updated with data; like ‘Name’, ‘Bank’ and ‘Reference Number’. Using this information BPEL will track the rejection status of a PC contract accordingly. A notification ‘Penny Credit Transaction Rejected’ will be sent to channels.
- If a transaction is rejected due to any reasons, then the bank can decide whether the penny credit transaction can be re-initiated or not. If bank allows re-initiation, then the details provided by the customer can be re confirmed and transaction will be initiated again.
- On failure of penny credit transaction, if bank decides to terminate the request, then the origination process will be moved to bank user manual rejection task.
- When there is no rejection received for a penny credit transaction within the stipulated time, then the transaction will be considered as successful. Once the transaction is successful then a message "Penny Credit Transaction is Successful" will be sent to channels. BPEL will then move to next stage.
- In the next stage (STDCA074) bank will request the customer to key in the penny credit amount that has been credited in external bank account. The amount entered by the customer will be cross verified with the original amount sent to the account. Upon receiving the notification on penny credit successfully, channel will consume a web service to get the penny credit amount input from the customer.
- Upon successful validation of the penny credit amount, account origination will automatically move to next stage.
- In the next stage, if the penny credit amount entered by the customer is wrong, then the additional attempts can be allowed to re-enter the amount. Maximum number of attempts need to be pre-defined.
- If the customer has not responded to the penny credit amount validation stage for a particular period of time then the stage will be automatically moved to ‘Notify Prospect/Customer’ stage. The maximum number of days that the system will remain in ‘Penny Credit Validation Stage’ for the customer response can be pre-defined using internal system parameters.
- The penny amount debit will be parked into a bank GL, maintained at the PC product category level. On successful account opening, the penny amount needs to be deducted manually from the initial funding of the new account and credits to the bank GL.
- If the penny credit amount is not validated by the customer correctly due to which the process is terminated, then the penny credit amount needs to be recovered manually from customer.
- If initial funding option is not selected but still bank wants to perform the penny credit validation then the penny credit amount needs to be recovered from the customer manually.
- The system enables initiation of origination cancellation by customer. However, the available data is stored in the system for future reference. The system provides a service which can be utilized by channels to send the request for termination. When termination request is received through the service, the system will automatically terminate the origination workflow. Termination of workflow will be possible only before the following stages.
- For prospects, customer initiated cancellation will be supported before customer creation stage. Once customer is created, the system disables cancellation of origination.
- For customers, customer initiated cancellation will be supported before account creation stage. Once the account is created, the system disables termination of the workflow.
- It will be possible to generate a report on account opening requests that are raised through specific channels along with its latest status.
2.4 Channel Workflow Chart
The below flow chart provides graphical flow of the process followed for channel requests

2.5 Stages for Request Received through Branch (BPEL)
In Oracle FLEXCUBE, the process for opening a savings account is governed by several user roles created to perform different tasks. These tasks are categorized to different stages. Stages fo opening a savings account are almost similar, with few exceptions. At every stage, the users (with requisite rights) need to fetch the relevant transactions from their task lists and act upon them. Similarly, at different times, the system will make calls to certain web services to process the transaction.
This section contains the following topics:
2.5.1 Stages in Account Opening Process
The account opening process comprises the following stages:
- Receive and verify account opening form and other documents
- Seek approval for missing documents / details
- Approve Account Opening (The combination of above two stages. If the request is submitted directly to BPEL by external channel, then the system begins the process this stage skipping the above.)
Note
If the Application is from Lead the process begins from the first stage and the stage 'Approve Account opening is not used.
- Store documents
- Modify and resubmit the application
- Input details of savings account
- Verify details of savings account
- Verify Prospect / Customer
- Sub process – Know your customer checks
- Block customer in Oracle FLEXCUBE
- Initiate Penny Credit Validation
- Modify Penny Credit Details
- Validate Penny Credit Amount
- Notify prospect / customer on negative status of KYC checks
- Create / Modify customer details in Oracle FLEXCUBE
- Create account in Oracle FLEXCUBE
- Store document reference in Oracle FLEXCUBE
- Check available balance
- Generate cheque book in Oracle FLEXCUBE
- Issue Debit Card
- Retrieve pre-printed cheque book and capture cheque book details
- Generate welcome / thanks letter in Oracle FLEXCUBE
- Notify the customer/prospect about the successful account opening with details
- Deliver account kit to customer
- Store documents
Only users who have procured the relevant access rights can perform activities under a stage.
2.5.2 BPEL Flow Diagram

2.6 Receive and Verify
This section contains the following topics:
- Section 2.6.1, "Receive and Verify Account Opening Form and Documents"
- Section 2.6.2, "Capturing Primary Customer Details"
- Section 2.6.3, "Specifying MIS Details"
- Section 2.6.4, "Specifying User Defined Fields"
- Section 2.6.5, "Capturing Personal Details"
- Section 2.6.6, "Capturing Domestic Details"
- Section 2.6.7, "Capturing Professional Details"
- Section 2.6.8, "Capturing Secondary Customer Details"
- Section 2.6.9, "Capturing Tertiary Customer Details"
- Section 2.6.10, "Capturing Signatory Details"
- Section 2.6.11, "Uploading Documents"
2.6.1 Receive and Verify Account Opening Form and Documents
In this stage, the bank receives the required documents from the customer for opening savings account, they are checked for completeness. If any documents are missing, the bank will get the documents from the prospect / customer before proceeding further or the bank will seek an approval from the appropriate internal authority for processing the account opening request without the complete set of documents / details as an exception. The basic details like customer information, customer contact information, details of account to be opened and the list of documents obtained from the customer are captured and the account opening form and all other documents received from the prospect / customer are uploaded as part of this activity.
The basic details like customer information, customer contact information and the details of account to be opened and the list of documents obtained from the customer are captured.
Users belonging to the user role RCSEROLE (Retail Customer Service Executive) can perform these activities.
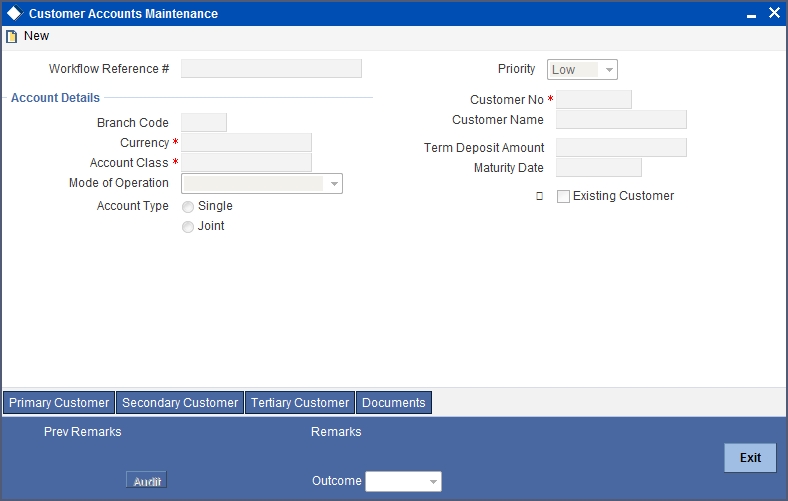
Specify the following basic details in this screen:
Application Category
Specify the application category from the adjoining option list.
Application Number
System generates the application number at the account opening stage. This number remains unique till the last stage.
Lead ID
Specify a valid Lead ID for which you need to create the account. The adjoining option list displays a list of valid lead ID. Select the appropriate one.
Branch Code
System displays the logged in branch code.
Status
System displays the status of the application.
Date
System displays the application date.
Priority
Select the priority for the creation of the savings account for a customer from the adjoining drop-down list. This list displays:
- Low
- Medium
- High
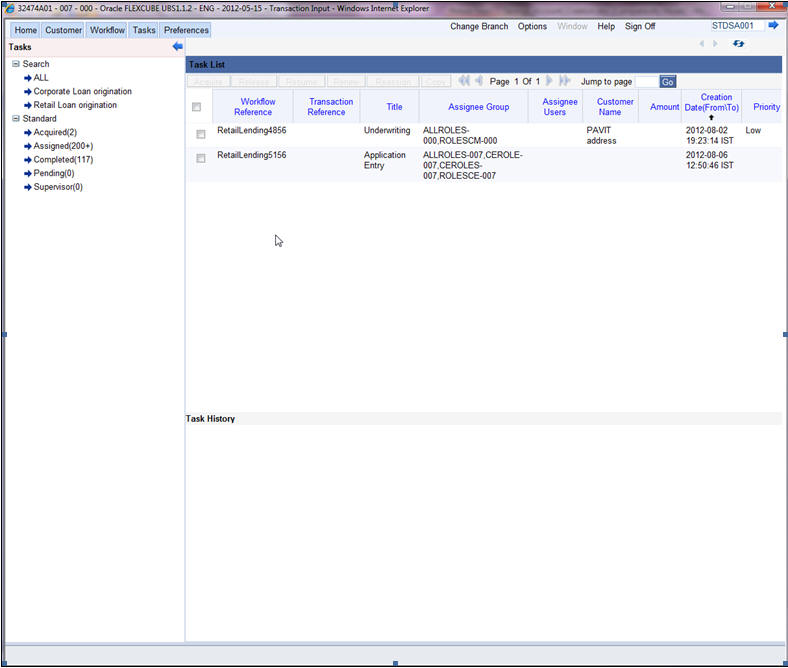
The option selected in this field is displayed in tasks search screen on following stages of account creation. The system supports the feature to list the records in the desired order. E.g. If the user prefers to list instance records in the order of ‘High’ priority to appear first the same will be feasible by clicking the column priority in task search screen and second attempt of the same will list in the vice-versa order as shown in the below given screen:
Account Details
Capture the basic account details of the customer here:
Account Branch
The current logged in branch is displayed here.
Account Currency
Specify the currency of the customer account. You can also select the appropriate currency from the adjoining option list. The list displays all the valid currencies maintained in the system.
Account Class
Specify the account class to be used by the account. You can also select the appropriate account class from the adjoining option list. The list displays all the valid account classes maintained in the system. You can choose the appropriate one.
Mode of Operation
Select mode of operation from the drop-down list. The options available are:
- Single
- Jointly
- Either – Any one or Survivor
- Former or Survivor
- Mandate Holder
Account Type
Select the account type from the drop-down list. The options available are:
- Single
- Joint
Customer Details
Local Branch
Specify the local branch code.
Customer Number
This field is enabled only if the customer is an existing customer. Specify a valid customer number. You can also select the appropriate customer number from the adjoining option list. The list displays all valid customers maintained in the system.
Customer Name
The name of the selected customer is displayed here.
Existing Customer
Check this option if the selected customer is an existing customer.
2.6.2 Capturing Primary Customer Details
Click ‘Primary Customer’ button to capture customer details. The following screen is displayed:
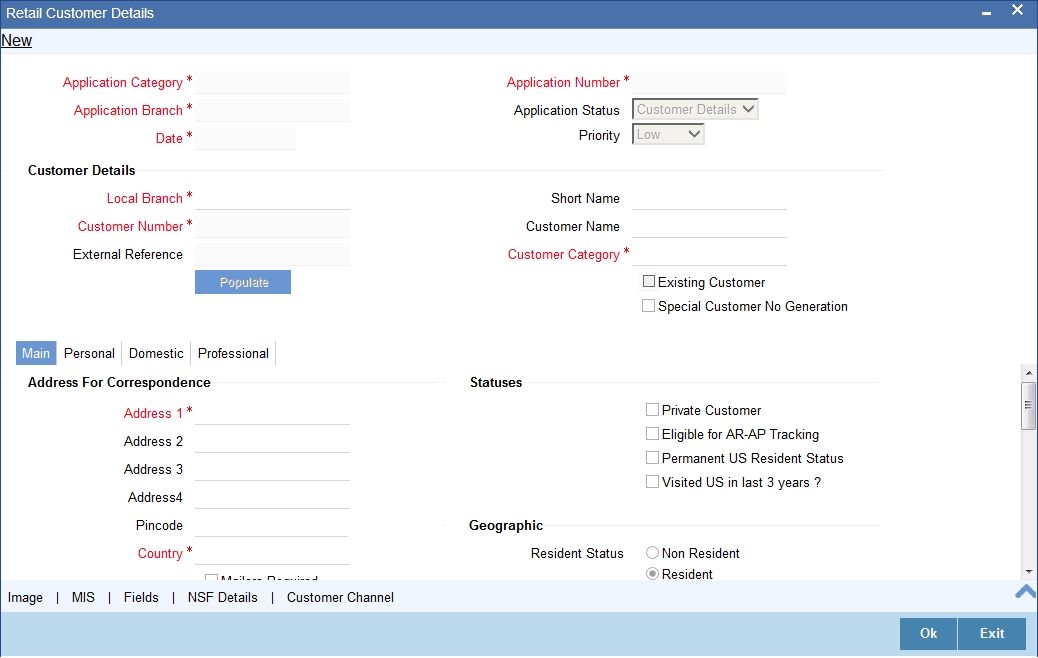
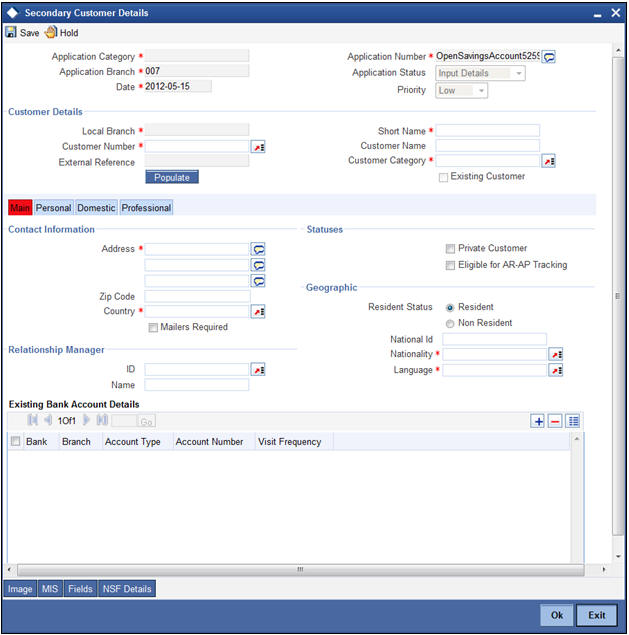
Here you can maintain the following details:
Contact Information
Adderss
Specify the address of the customer.
Zip Code
Specify the zip code for the customer address.
Country
Specify the country in which the customer resides from the option list.
Mailers Required
Check this if the customer has chose to receive mailers.
Statuses
Private Customer
Check this box to indicate that the customer is a private type of customer.
Eligible for AR-AP Tracking
Check this box to indicate that the account receivable and account payable process is to be enabled for this customer.
Permanent US Resident Status
Check this box to indicate that the corresponding director is a permanent US resident.
Visited US in last 3 years?
Check this box to indicate that the beneficial owner has visited US in the last three years.
Geographic
Resident Status
Indicate the customer’s resident status. The options are as given below:
- Resident
- Non Resident
National Id
Specify the national Id of the customer.
Nationality
Specify the nationality of the customer. You can also select the nationality of the customer from the adjacent option list. The list displays a list of countries maintained in the system.
Language
As part of maintaining customer accounts and transacting on behalf of your customer, you will need to send periodic updates to your customers in the form of advices, statement of accounts and so on.
Indicate the language in which your customer wants the statements and advices to be generated.
Power of Attorney
Note
If the FATCA is enabled at the bank and the check box 'Power of Attorney' is checked here, then it is mandatory to specify the Power of Attorney information.
Power of Attorney
Check this box to indicate that the customer account is to be operated by the power of attorney holder.
Holder Name
The person who has been given the power of attorney.
Address
Specify the address of the power of attorney holder.
Country
Specify the country of the power of attorney holder.
Nationality
Specify the nationality of the power of attorney holder.
Telephone ISD Code +
Specify the international dialling code for the telephone number of the power of attorney holder. The adjoining option list displays valid ISD codes maintained in the system. Select the appropriate one.
Telephone Number
Specify the telephone number of the power of attorney holder.
Additional Details
Preferred Date of Contact
Specify the preferred date for contacting the customer. You can also select the date from the adjoining calendar icon.
Preferred Time of Contact
Select the preferred time for contacting the customer on the preferred date of contact, from the adjoining drop-down list. This list displays the following time slots in 24hrs format:
- Any time
- 1 hour combination of timings starting from 12am – 1am to 23pm – 12am.
Existing Bank Account Details
If the customer is an existing customer you ned to specify the following details:
Bank
Specify the name of the bank in which the customer is holding an account.
Branch
Specify the branch where the customer holds an account.
Account Type
Specify the type of account to be created.
Account Number
Specify the existing account number.
Visit Frequency
Specify the number of times the customer visits or transacts with the existing bank.
2.6.3 Specifying MIS Details
Click ‘MIS’ button to specify the MIS details. The ‘Customer MIS’ screen is displayed:

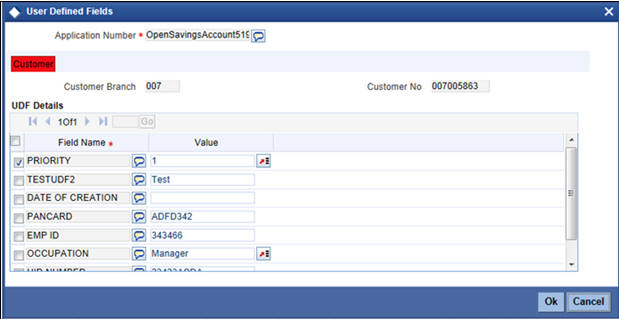
2.6.4 Specifying User Defined Fields
Click ‘UDF’ button to upload the documents. The ‘User Defined Fields’ screen is displayed:
2.6.5 Capturing Personal Details
Click ‘Personal tab to capture personal details. The following screen is displayed:
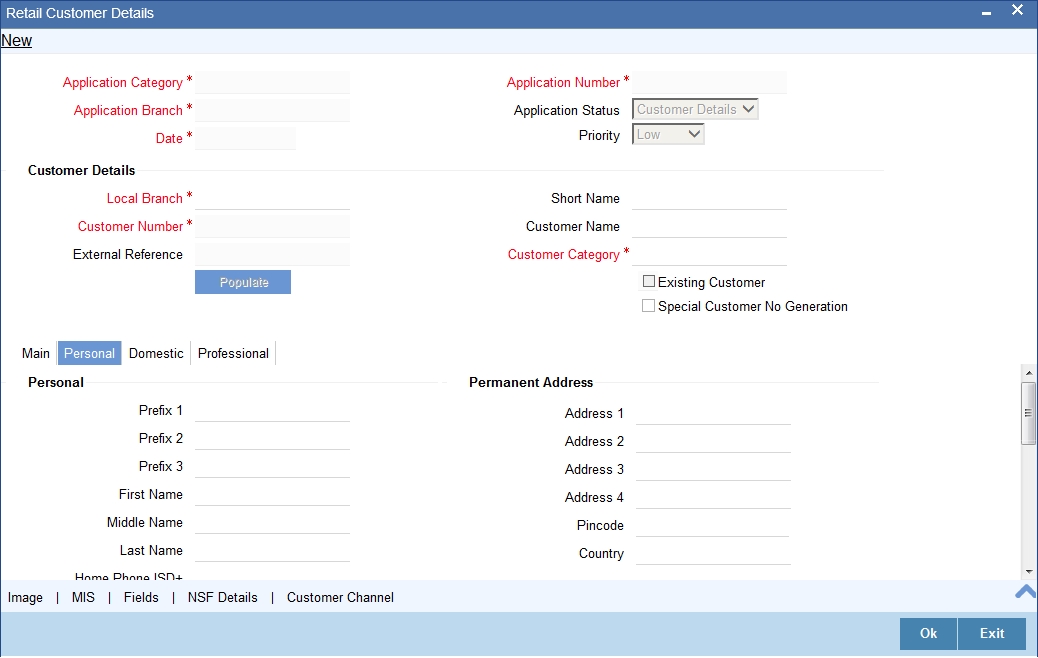
Personal
Prefix1-3
Specify prefix for the customer name
First Name
Specify first name of the customer.
Middle Name
Specify middle name of the customer.
Last Name
Specify last name of the customer.
Work Phone
Specify a valid office phone number of the customer.
Home Phone
Specify a valid home phone number of the customer.
Specify a valid e-mail ID of the customer for correspondence.
Mobile Number
Specify a valid mobile number of the customer.
Gender
Select a valid gender of the customer from the options. The following options are available for selection:
- Male
- Female
- Other
- Prefer Not to Disclose
Permanent address
You can specify the permanent address details here:
Address1-4
Specify the permanent address of the customer.
Pincode
Specify the pin code of the permanent address.
Passport Details
You can specify the passport details here:
Passport Number
Specify a valid passport number of the customer.
Issue Date
Specify the date on which the specified passport was issued from the adjoining Calendar icon.
Expiry Date
Specify the expiry date of the specified passport from the adjoining Calendar icon.
Legal Guardian
You can specify the legal guardian details here:
Date of Birth
Specify date of birth of the legal Guardian
Minor
Check the box if the customer is a Minor.
Guardian
Specify the details of the legal guardian.
2.6.6 Capturing Domestic Details
Click ‘Domestic’ tab to capture domestic details. The following screen is displayed:

Domestic
Educational Status
Select the educational status from the adjoining drop-down list. Available options are:
- Non Student
- Under Graduate
- Graduate
- Post Graduate
Marital Status
Select the marital status from the adjoining drop-down list. Available options are:
- Single
- Married
- Divorced
- Remarried
- Separated
- Spouse Expired
Accommodation
Select the accommodation type from the adjoining drop-down list. Available options are:
- Self Owned
- Company Provided
- Other
Dependant Details
Spouse Name
Specify the spouse name of the customer.
Spouse Employment Status
Select the spouse employment status from the adjoining drop-down list. Available options are:
- Full Time Permanent
- Full Time Temporary
- Self Employed
- Unemployed
- Retired Pensioned
- Part Time
- Retired Non Pensioned
- Other
Dependent Children
Specify the number of dependent children.
Other Dependants
Specify the number of other dependants, if any.
2.6.7 Capturing Professional Details
Click ‘Professional’ button to capture professional details. The following screen is displayed:
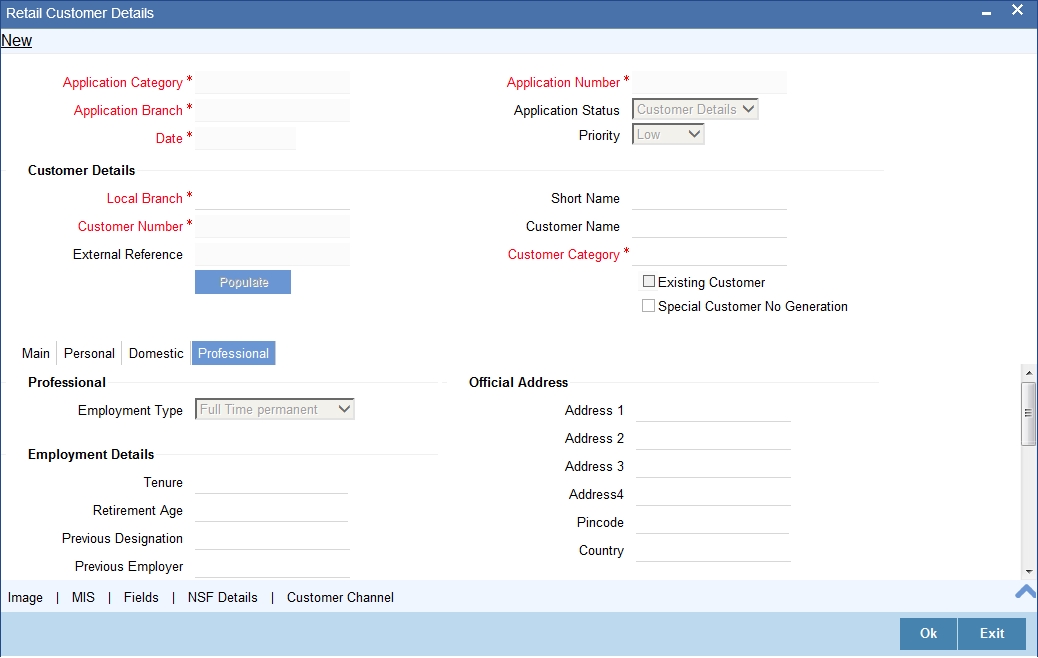
Professional
Employment Type
System displays the employment type here.
Official Address
Address
Specify the office address of the customer.
Zip Code
Specify the zip code of the customer’s office address.
Country
Specify the country name for the customer’s office address.
Employment Details
Tenure
Specify the tenure of the employment.
Retirement Age
Specify the age of retirement for the customer.
Previous Designation
Specify the previous designation of the customer.
Previous Employer
Specify the name of the previous employer.
Current Designation
Specify the current designation of the customer.
Current Employer
Specify the name of the current employer.
Income
Income Currency
Specify the currency in which the customer is paid.
Salary
Specify customer’s salary.
Other Income
Specify customer’s other income, if any.
Contact
Telephone
Specify the telephone number of customer’s office.
Telex
Specify the telex number of customer’s office.
Fax
Specify the fax number of customer’s office.
Specify the email id of customer’s office.
Expense
Rent
Specify the rent amount if the customer is staying in the rented house.
Insurance
Specify the insurance policies the customer possesses.
Loan Payment
Specify the loan amount if the customer is paying any loan.
Other Expense
Specify other expenses, if any.
House Value
Specify the value of the houe customer resides.
Number of Credit Cards
Specify the number of credit cards the customer holds.
2.6.8 Capturing Secondary Customer Details
Click ‘Secondary Customer’ button to capture customer details. The following screen is displayed:
2.6.9 Capturing Tertiary Customer Details
Click ‘Tertiary Customer’ button to capture customer details. The following screen is displayed:
For further details on the fields displayed on this screen, refer to the section ‘Primary Customer Details’ in this chapter.
2.6.10 Capturing Signatory Details
Click ‘Account Signatory’ button to invoke the ‘Signatory Details’ screen.
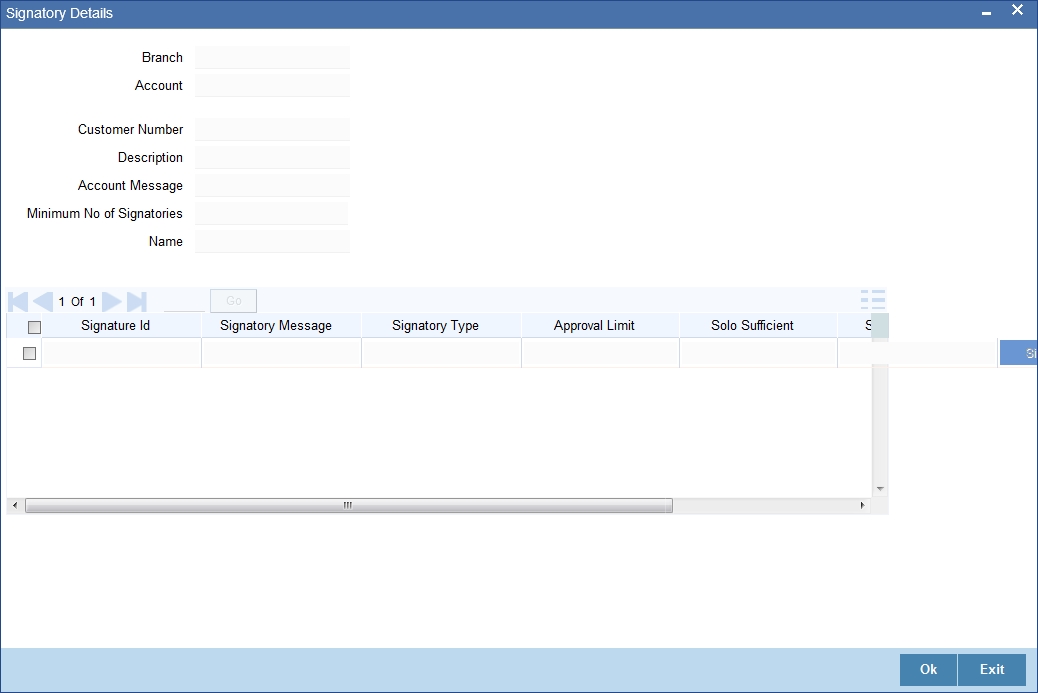
Here you can capture the following details:
Account Branch
The system defaults the current branch here.
Account Number
This system displays the account number to which signatories are to being linked.
Account Description
The system displays the description for the account selected.
Account Currency
The system displays the account currency.
Minimum Number of Signatories
Specify the minimum number of signatories necessary to endorse an instrument involving the account.
Note
If the linked or replicated signatories are less than the specified minimum number then the system displays an error message.
Account Message
Specify a brief description about particular signatories. It can be related to the name, number and the type of signatory of your customer. You can specify a maximum of 4000 characters as account message length.
For instance you can capture a message like - "This signatory is a joint account holder with rights to sign instruments only up US 8000".
2.6.10.1 Account Signatory Details Tab
You can maintain account signatory details for different customers using this tab.Click on ‘Account Signatory Details’ tab to invoke the following screen
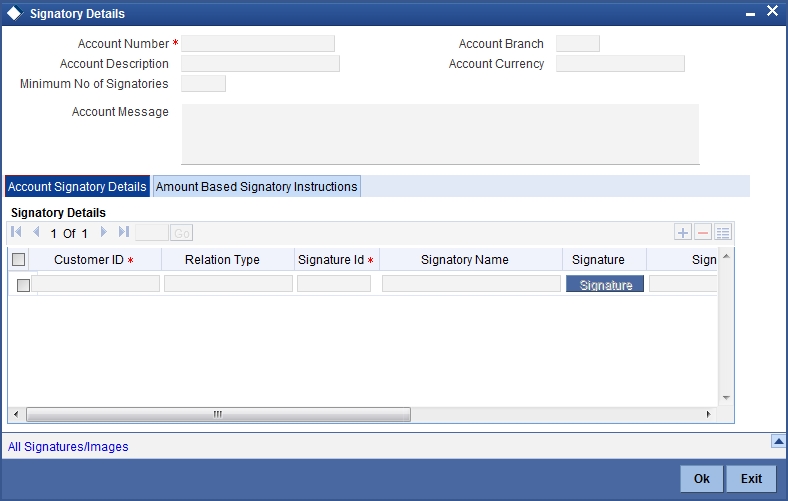
Customer ID
Specify the customer signatory you want to link to the account.
You can link a customer signatory to an account either by:
- Click on the option list next to the Signatory Number. A list of customer signatory numbers, whose details have been captured will be displayed, along with their names. Pick up the signatory whom you want to make an account signatory for the account
- Keying-in the customer Signatory Number and Name directly, if the signatory number has not been maintained through the Customer Signatory details screen
- If the check box 'Replicate Signature' is checked in account level the signature details will be defaulted from the customer maintenance; however you are allowed to add/remove signatories manually.
Note
If the signatory ID that you specify has not been maintained, the system will generate an error and you will not be able to create an account.
Relation Type
The system displays the relation type of the customer.
Signatory ID
Specify the signatory ID of the customer. Alternatively, you can select the ID from the option list. The list displays values maintained in CIF signatory for the customer number.
Signatory Name
The system displays the corresponding name of the signatory number specified.
Signature Type
Specify the signatory type of the customer. Alternatively, you can select the type from the option list. The list displays signatory types maintained for the customer number.
Approval Limit
Specify the amount up to which the account signatory can approve for debits.
Signatory Message
Specify additional signatory message details in this field. You can enter a maximum of 4000 characters, alphanumeric.
Solo Sufficient
Check this box to indicate whether one signatory detail is sufficient.
2.6.10.2 Amount Based Signatory Instruction Tab
You can maintain account signatory instructions for different amount slabs in this tab.Click on ‘Amount Based Signatory Instruction, tab to invoke the following screen:
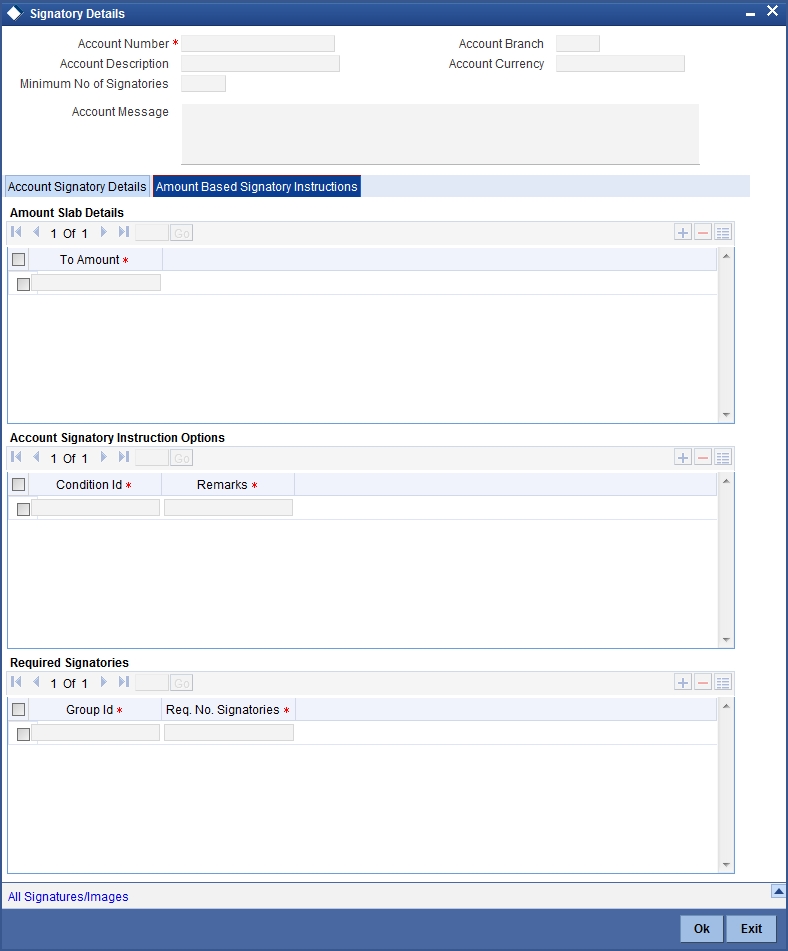
Amount Slab Details
To Amount
Specify the slabs by setting a ‘To Amount’. The amount slab will start from zero and the first value entered sets the slab from zero to that amount. The amounts are arranged in ascending order. For next slab, an amount above the previous ‘To Amount’ is considered as the ‘From’ value.
For example, If the ‘To Amount’ entered are as below
To Amount |
10,000 |
100,000 |
1,000,000 |
Then the maintenance will indicate the below amount slabs:
From Amount |
To Amount |
0 |
10,000 |
Above 10,000 |
100,000 |
Above 100,000 |
1,000,000 |
Account Signatory Instruction Options
You can define different conditions for the amount slabs in this section.
Condition Id
Specify a unique Id for condition to be set.
Remarks
Give a brief description for the condition id.
Required Signatories
You can provide the required signatories for the conditions set in this section.
Signature Type
Select the signature type required from the option list. The list displays the signature types maintained in static type maintenance screen.
Note
The signature type cannot be repeated for a condition.
Required No. of Signatories
Specify the number of signatories for each signatory type.This number should be less than or equal to the total number of signatories maintained under the signatory type.
Note
The Amount Based Signatory Instructions tab will be enabled in the following RT screens only if the value of param ‘AMOUNT_BASED_SV’ is Y in CSTM_BRANCH_LOC_PARAMS.
- Cash Withdrawal (1001)
- Account to Account Transfer (1006)
- Miscellaneous Customer Debit (1008)
- TC Sale against Account (1009)
- BC Issue against Account (1010)
- Cheque Withdrawal (1013)
- DD Issue against Account (1014)
- Bill Payment Against account (1075)
- Account Close Out Withdrawal by BC (1300)
- Close Out Withdrawal (1301)
- Multimode Deposit Redemption (1317)
- Account Close Out Withdrawal (1320)
- Account Close Out Withdrawal by Multi Mode (1350)
- Cash Transfer (1405)
- Inward Clearing Data Entry (5555)
- FX Sale Against Account (8206)
- TT Issue against Account (8318)
- DD Issue against Cheque (8330)
- BC Issue against Cheque (8335)
- In House Cheque Deposit (LOCH)
- Payment by in house cheque (1045)
2.6.10.3 All Signatures/Images button
Click ‘All Signatures/Images’ button to view ‘Customer Signature/Image Consolidated View’ screen.
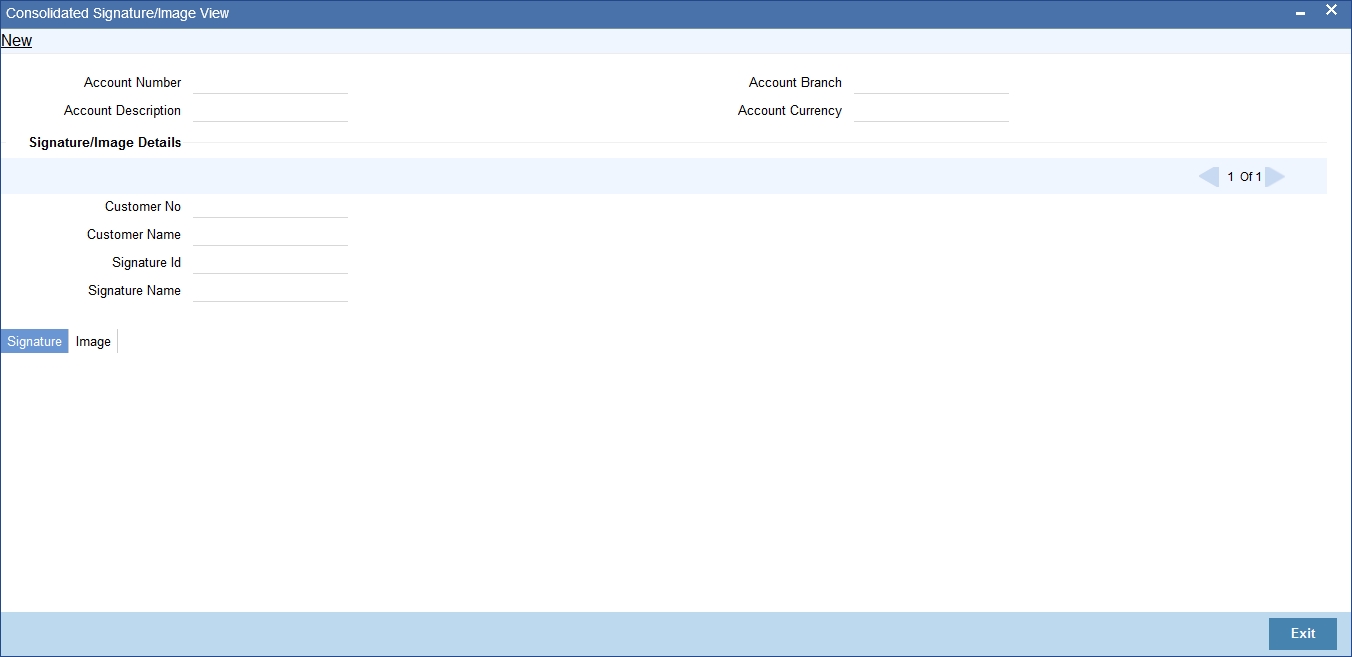
The following details will be displayed in the above screen
- Account Number
- Account Branch
- Account Description
- Account Currency
- Customer Number
- Signature Id
- Signature Name
The ‘Signature/Image’ tab displays nine signatures/Images for a signature id in a single pane with three signatures/Images in a row.
If there is more than one signature id linked to a customer account, then they would be displayed in different pages.
Each image is provided with the following buttons:
- Zoom In
- Zoom Out
- Rotate Clockwise
- Rotate Anticlockwise
- Flip Horizontal
- Flip Vertical
2.6.11 Uploading Documents
You can capture the customer related documents in central content management repository through the ‘Documents’ screen. Click ‘Documents’ button to invoke this screen.
Here, you need to specify the following details:
Document Category
Specify the category of the document to be uploaded.
Document Reference
The system generates and displays a unique identifier for the document.
Document Type
Specify the type of document that is to be uploaded.
Upload
Click ‘Upload’ button to open the ‘Document Upload’ sub-screen. The ‘Document Upload’ sub-screen is displayed below:
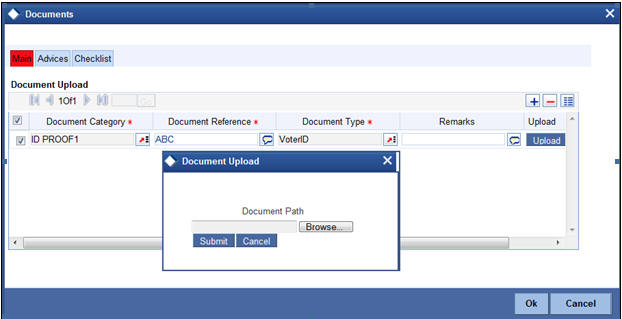
In the ‘Document Upload’ sub-screen, specify the corresponding document path and click the ‘Submit’ button. Once the document is uploaded through the upload button, the system displays the document reference number.
View
Click ‘View’ to view the document uploaded.
In ‘Savings Account Creation’ process, ‘Document Upload’ feature is not available in all the stages. Its availability in this process is given below:
Stage Title |
Function Id |
Callform exists |
Upload(Available/Not available) |
View(Available/Not available) |
Receive and verify account opening form and other documents |
STDSA001 |
Available |
Available |
Available |
Seek approval for missing documents / details |
STDSA002 STDSA080 |
Available |
Available |
Available |
Input details of savings account |
STDSA003 |
Available |
Not Available |
Available |
Verify details of savings account |
STDSA004 |
Available |
Not Available |
Available |
Modify details of savings account |
STDSA005 |
Available |
Not Available |
Available |
Verify prospect /customer details |
STDKYR01 |
Available |
Available |
Available |
Ascertain if KYC checks are required |
STDKYR02 |
Available |
Available |
Available |
SDN check |
|
|
|
|
Verify SDN Match |
STDKYR03 |
Available |
Not Available |
Available |
Inform Regulatory / Internal authorities on KYC checks failure |
STDKYR06 |
Available |
Not Available |
Available |
Internal blacklist check |
STDKYR04 |
Available |
Not Available |
Available |
Verify customer / prospect contact details |
STDKYR05 |
Available |
Not Available |
Available |
Other KYC Checks |
STDKYR07 |
Available |
Not Available |
Available |
KYC Decision |
STDKYR08 |
Available |
Not Available |
Available |
Sub process – Know your customer checks |
|
|
|
|
Block customer in FLEXCUBE |
|
|
|
|
Notify prospect / customer on negative status of KYC checks |
STDSA018 |
Not Available |
Not Available |
Available |
Create / Modify customer details in FLEXCUBE |
STDSA020/STDSA021 |
Available |
Available |
Available |
Create account in FLEXCUBE |
STDSA015 |
Available |
Not Available |
Available |
Store document reference in FLEXCUBE |
STDSA010 |
Available |
Not Available |
Available |
Check available balance |
STDSA006 |
Available |
Not Available |
Available |
Generate cheque book in FLEXCUBE |
STDSA008 |
Not Available |
|
|
Retrieve preprinted cheque book and capture cheque book details |
STDSA007 |
Not Available |
|
|
Generate welcome / thanks letter in FLEXCUBE |
|
|
|
|
Deliver account kit to customer |
STDSA009 |
Not Available |
|
|
Store documents |
STDSA010 |
Available |
Not Available |
Available |
Refer the Procedures User Manual for details about task list.
2.7 Seek Approval for Missing Documents / Details
In this stage, the bank will decide whether to approve processing the account opening request as an exception, if the account opening with incomplete details / documents as an exception is approved. The bank proceeds with processing the request and simultaneously arranges to follow up with the customer for submission of the pending details / documents. In case the overrides cannot be approved, the bank obtains the incomplete details / documents from the customer before proceeding further. The decision / remarks of the approver are captured.
Users belonging to the user role RCSMROLE (Retail Customer Service Manager) can perform these activities.
Go to the pending list in the system. The system displays all the pending activities. Click ‘Acquire’ button adjoining the ‘Approve Account Opening’ task to acquire it. The system displays the information message as "..xxx Acquire Successful"
If you have requisite rights, double click on the task in your ‘Assigned’ task list. You can invoke any of the following screens, based on the origination of initiation.
This section contains the following topics:
- Section 2.7.1, "Origination Initiated by Oracle FLEXCUBE Branch"
- Section 2.7.2, "Origination Initiated by External Channels"
- Section 2.7.3, "Auxiliary Tab"
- Section 2.7.4, "Nominee Tab"
- Section 2.7.5, "Specifying Penny Credit Details"
- Section 2.7.6, "Conversation Tab"
2.7.1 Origination Initiated by Oracle FLEXCUBE Branch
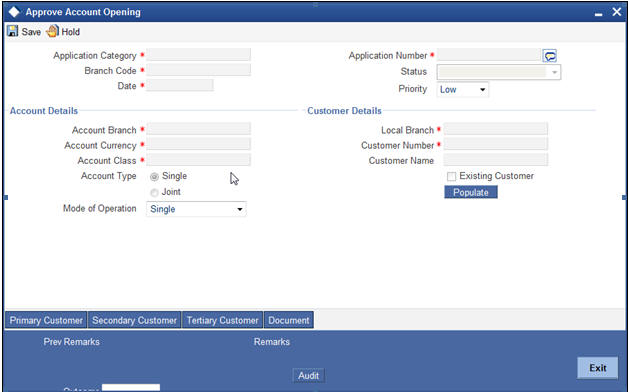
The following details from the first stage are displayed on clicking the ‘Populate’ button:
Header Section
- Application Category
- Branch
- Date
- Channel
- Request ID
- Application Number
- Conversation ID
- Lead ID
- Status
Account Details
- Account Branch
- Account Currency
- Account Class
- Purpose of Account
- Overdraft
Customer Details
- Local Branch
- Customer Number
You can specify the following details:
Priority
Select the priority you need to assign to the application from the adjoining drop-down list. This list displays the following values:
- Medium
- Low
- High
Purpose of Account
Specify the purpose for maintaining the account.
2.7.2 Origination Initiated by External Channels
You can invoke ‘Approve Account Opening’ for savings screen by typing ‘STDSA080’ in the field at the top right corner of the Application tool bar and clicking the adjoining arrow button
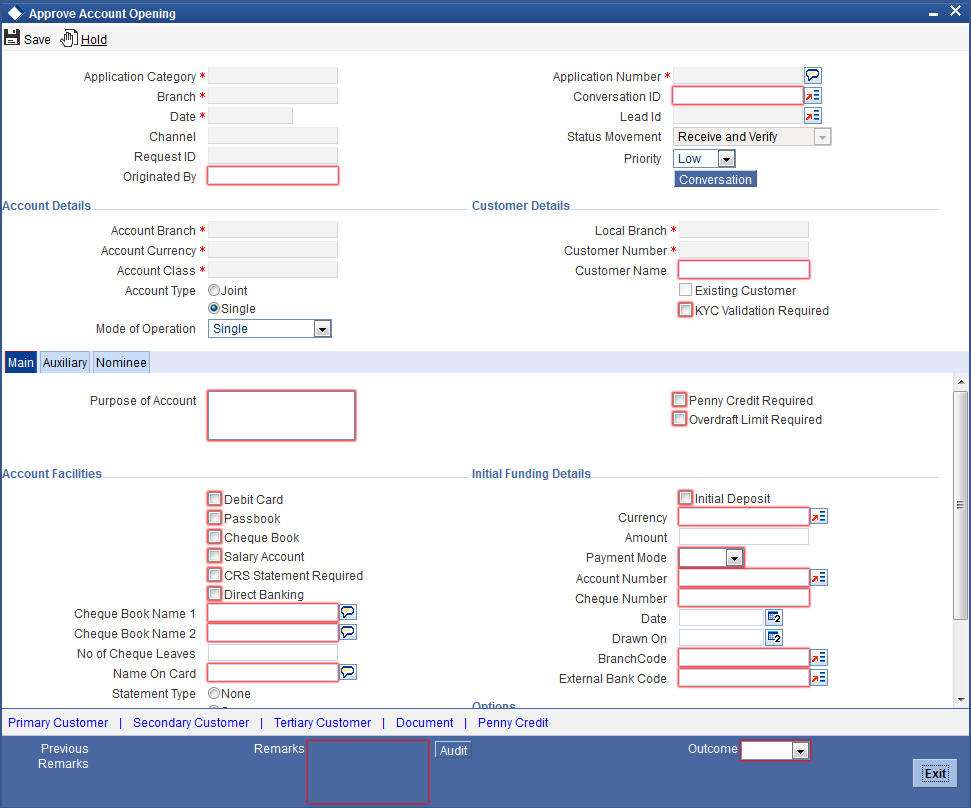
You can maintain the following details:
Account Details
Account Number
Specify the account number.
Account Description
System displays the account description based on the account number specified.
Media
Specify the media i.e the mode of communication to be used. It can either be through SWIFT, mail, fax etc. You can also select the media from the option list provided. The list displays all the media maintained in the system. Select and click the appropriate media.
Purpose Of Account
Specify the purpose for opening an account.
Penny Credit Required
Check this box if you need penny credit validation. Based on the penny credit validation check box and the details obtained for penny credit validation, the system will initiate the penny credit transaction.
Penny Credit is supported only for the Savings Account.
Overdraft Limit Required
Check this box if you require Overdraft Limit.
Customer Details
KYC Validation Required
Check this box if you require KYC validation for the prospect/customer.
The following scenarios are handled based on the value of check box.
- For opening an offline account opening through BPEL flow, the KYC must always be checked and sent by channels.
- During the ‘Ascertain KYC checks required’ stage, Bank user will take the decision on KYC by considering this check box
Account Facilities:
Cheque Book
Check this box if the customer requires the check book facility.
CRS Statement Required
Check this box to indicate that the CRS statement is required.
Debit Card
Check this box if the customer needs a debit card.
Direct Banking
Check this box if the customer needs direct banking facility.
Cheque Book Name1,2
Specify the name customer prefers on the check book.
No of Cheque Leaves
Specify the number of check leaves customer needs.
Name on Card
Specify the name customer prefers on the debit card. If you have checked the ‘Debit Card’ check box, then it is mandatory to provide these details.
Statement Type
Select a valid statement type from the options. The following options are available for selection:
- None
- Summary
- Detailed
Statement Cycle
Select a valid cycle statement from the adjoining drop-down list. This list displays the following options:
- Annual
- Semi Annual
- Quarterly
- Monthly
- Fortnightly
- Weekly
- Daily
On
Specify the Month, Date or Day for the statement generation.
Initial Funding Details
In this section, specify the initial funding details of the customer.
Initial Deposit
Check this box to indicate that initial deposit is required.
Currency
Specify the currency in which the initial amount is deposited. You can also select the appreciate currency from the adjacent option list. The list consists of all the currencies maintained in the system.
Amount
Specify the initial deposit amount.
Payment Mode
Select the mode of initial payment. The options available are:
- GL
- Cash
- Transfer
- Cheque
- Account
Account Number
Specify the account number of the customer from which the initial deposit is made.
Cheque Number
Specify the cheque number if the initial deposit is made through cheque.
Date
Specify the date of the cheque.
Drawn On
Specify the bank on which the cheque is drawn.
Branch
Specify the branch on which the cheque is drawn. The adjoining option list displays all valid branch codes. Select the appropriate one.
External Bank Code
Specify the bank code of the external channel. The adjoining option list displays all valid branch codes. Select the appropriate one.
2.7.3 Auxiliary Tab
Click on ‘Auxiliary’ tab to specify the following details:
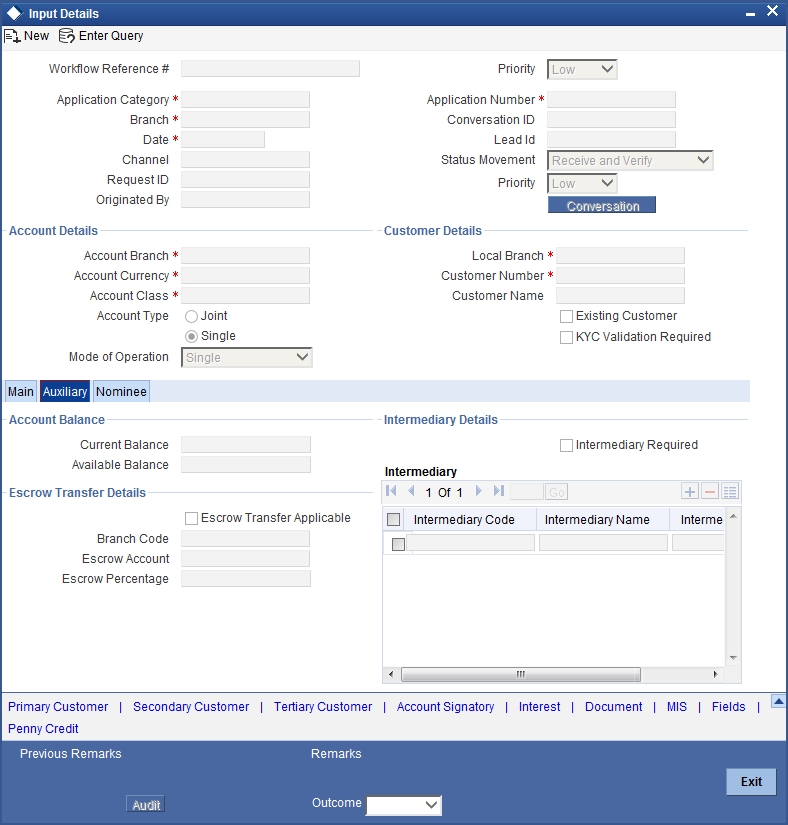
Account Balance
Current Balance
System displays the current balance of the account.
Available Balance
System displays the available balance of the account.
Intermediary Details
Intermediary Required
Check this box to indicate that the intermediary details have to be provided for the customer.
Escrow Transfer Details
Escrow Transfer Applicable
Check this box to indicate that the escrow transfer is applicable for this account.
Branch Code
Specify the escrow branch code.
Escrow Account
Specify the escrow account number.
Escrow Percentage
Specify the escrow percentage for the account.
Intermediary
Intermediary Code
Specify the intermediary code from the adjoining option list.
Intermediary Name
System displays the intermediary name.
Intermediary Ratio
Specify the intermediary ratio to be divided among intermediaries in case of more than one intermediary.
2.7.4 Nominee Tab
Click nominee tab to maintain nominee details:
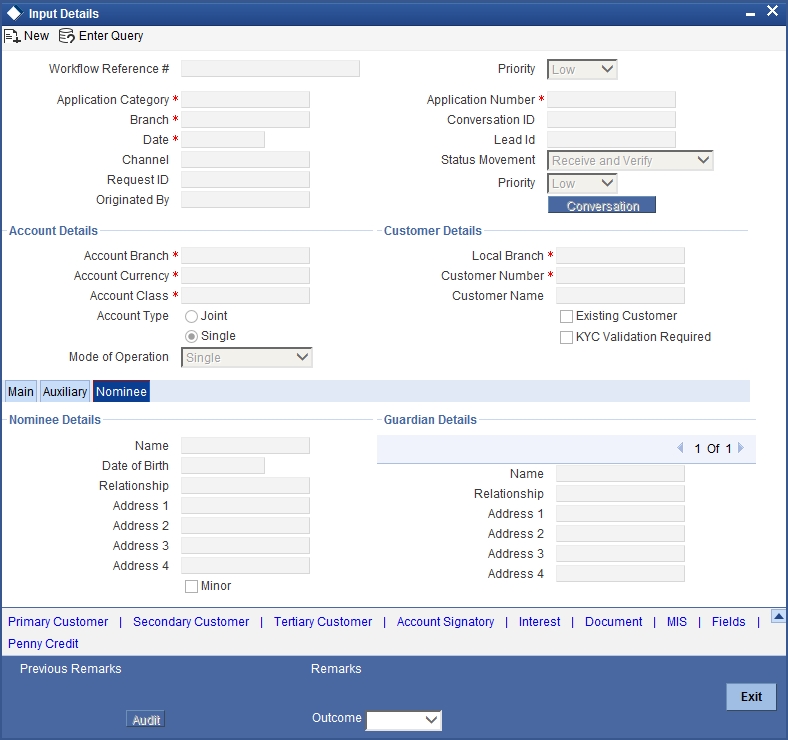
Nominee Details
Name
Specify the name of nominee.
Date of Birth
Specify the date of birth of nominee.
Relation ship
Specify the relationship of the nominee with the customer
Address 1-4
Specify the address of the nominee.
Minor
Check this box if the nominee is a minor.
Guardian Details
If the nominee is a minor then it is mandatory to maintain the following details
Name
Specify the name of guardian.
Relation ship
Specify the relationship of the nominee with the guardian.
Address 1-4
Specify the address of the guardian.
2.7.5 Specifying Penny Credit Details
Click ‘Penny Credit’ link to maintain penny credit details.
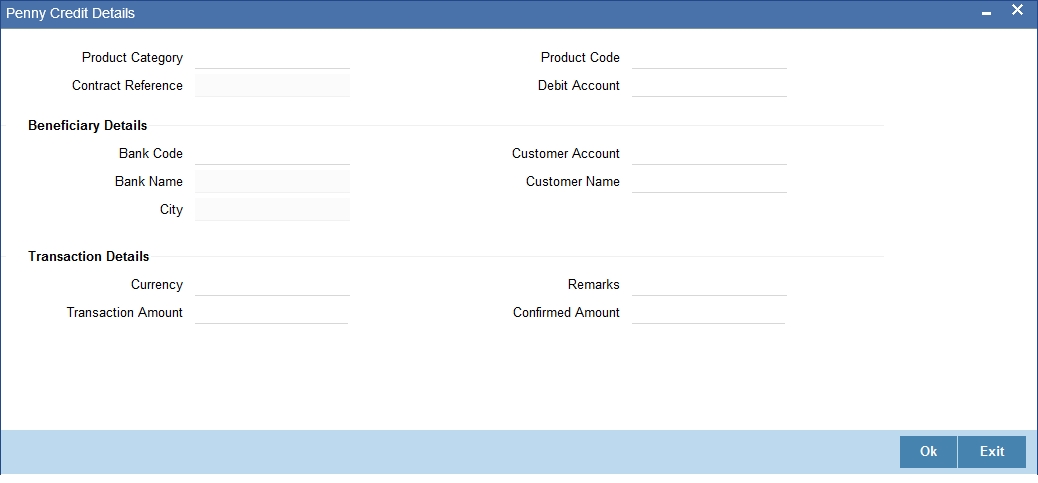
If the ‘Penny Credit Required’ check box is checked, then it is mandatory to provide the details for the mandatory fields in this screen.
Product Category
Specify the Product category in which the PC contract will be created. The adjoining option list displays all valid product categories. Select the appropriate one.
Product Code
Specify the Product code associated with the product category selected. The adjoining option list displays all valid product codes based on the product category selected. Select the appropriate one
Contract Reference
The system displays the reference number of the PC contract.
Debit Account
Specify the account number from which penny credit amount needs to be debited. The adjoining option list displays all valid account numbers. Select the appropriate one.
Beneficiary Details
Bank Code
Specify the Bank code in which prospect maintains the account. The adjoining option list displays all valid bank codes. Select the appropriate one.
Bank Name
The system displays the bank name based on the bank code selected.
City
The system displays the City name based on the bank code selected.
Customer Account
Specify the account number of the customer in the external bank. The adjoining option list displays all valid account number. Select the appropriate one.
Customer Name
Specify the name of the customer as exists in the other bank account number.
Transaction Details
Currency
Specify the currency of the external account. The adjoining option list displays all valid currency codes. Select the appropriate one.
Transaction Amount
Specify the amount which the bank will send to the external bank account for penny credit validation.
Transaction Remarks
Specify the details of workflow reference number and the prospect name, if any.
2.7.6 Conversation Tab
Click ‘Conversation’ button to maintain conversation details.
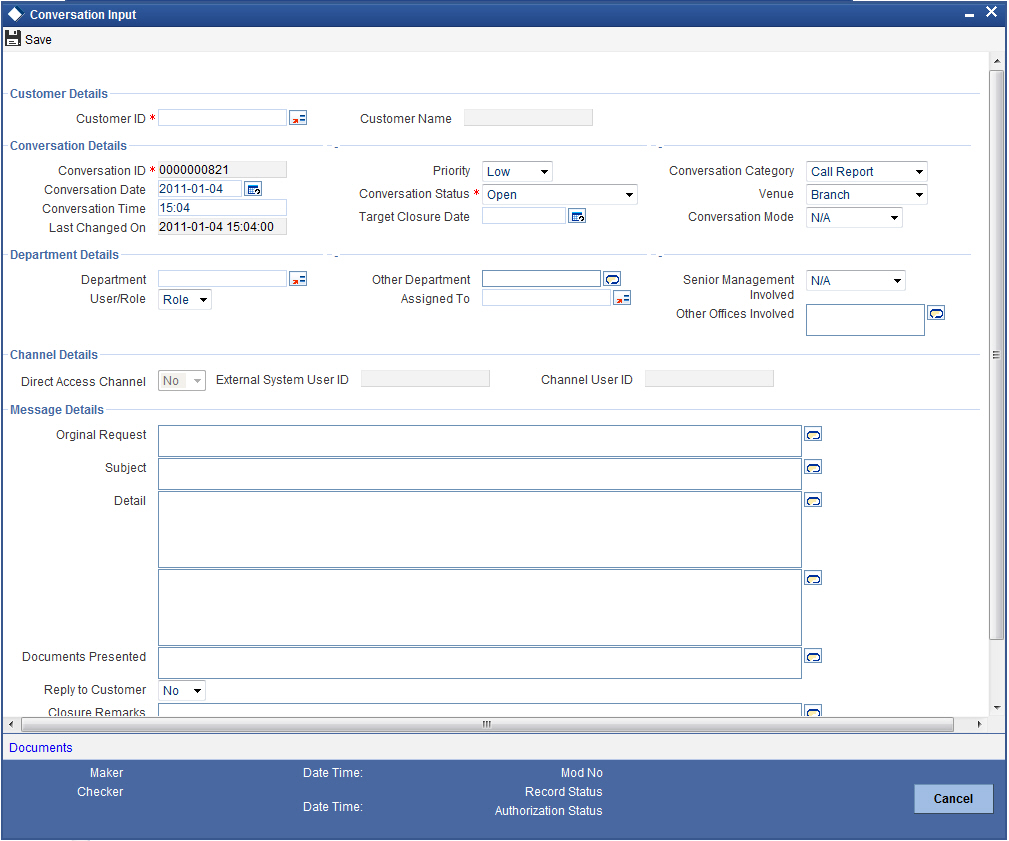
You can maintain the conversation details here:
Customer Details
Customer ID
The system displays the actual customer ID, if the request is submitted for existing customer. If the customer is prospect, then the system displays the Walk in customer ID.
Customer Name
The system displays the actual customer name, if the application is submitted for existing customer. If the application is for prospect, then the field is blank.
Conversation Details
Conversation ID
The system displays the conversation ID
Priority
Select the priority of the conversation from the adjoining drop-down list. The list displays the following values:
- Low
- Medium
- High
Conversation Category
Select the conversation category from the adjoining drop-down list. The list displays the following values:
- Call Report
- Courtesy Meeting
- Cust Interaction
- Service Request
- Complaints
- Lead
- N/A
- IVR
Conversation Date
Specify the date of conversation from the adjoining calendar icon.
Conversation Status
Select the status of conversation from the adjoining drop-down list. The list displays the following values:
- Open
- WIP
- Close
- Pending with Customer
- Re-open
Venue
Select the venue of conversation from the adjoining drop-down list. The list displays the following values:
- Branch
- Face to Face
- Client Office
- Client Residence
- Public Place
- N/A
Conversation Time
Specify the conversation time.
Target Closure Date
Specify the date of target closure from the adjoining calendar icon.
Conversation Mode
Select the mode of conversation from the adjoining drop-down list. The list displays the following values:
- N/A
- Meeting
- Telephone
- Other
- Face to Face
Last Changed On
Department Details
Department
Specify the department of the bank to which the conversation is sent. The adjoining option list displays all valid departments. Select the appropriate one.
Other Department
Specify other departments, if different from the once listed in ‘Department’ field.
Senior Management Involved
Select the senior management involved in the conversation, if any, from the adjoining drop-down list. The list displays the following values:
- N/A
- COO
- Region Head
- Senior RM
- CEO
User/Role
Select ‘User’ or ‘Role’ to which the conversation is assigned.
Assigned To
Specify the User/Role to which the conversation is assigned. The adjoining option list displays all valid User and Role types maintained in the system. Select the appropriate one.
Other Offices Involved
Specify the other offices, if any are involved.
Channel Details
The system defaults the following channel details:
- Direct Access Channel
- External System User ID
- Channel User ID
Message Details
Original Request
Specify the details of the original request.
Subject
Specify the subject of the message.
Detail
Specify the details of the message.
Documents Presented
Specify the documents presented.
Reply to the Customer
Select ‘yes’ or ‘No’ to indicate the system to send a reply to the customer.
Closure Remarks
Specify the closure remarks, if any
Below table depicts the different use cases for interaction:
Use Cases |
Customer/Prospect |
Conversation ID field in main screen |
Conversation ID in call button |
Customer ID |
Assigned To |
Remarks |
1. Conversation has begun before the origination is started. 2. Conversation is begun during origination. |
Prospect |
1. Conversation ID sent by channel gets updated here. 2. The updated conversation ID cannot be amended. |
1. Conversation ID sent by channel gets updated here. |
Defaults to Branch walk in customer ID. |
Default to Help Desk |
1. Once the customer id is created for the prospect branch walk in id will be replaced with the newly created customer id. 2. Once the branch is chosen by the prospect the conversation will be assigned to the “All Roles” for that branch. |
3. Conversation is not started in the channel; it has been started by the branch user during any stage in origination. |
Prospect |
1. Auto generated conversation ID gets updated here. 2. The updated conversation ID cannot be amended. |
1. Conversation ID will be auto generated. |
Defaults to Branch walk in customer ID. |
“All roles” for the branch selected. |
1. Once the customer id is created for the prospect branch walk in id will be replaced with the newly created customer id. |
4. Conversation is created out of the origination flow and attached to origination |
Prospect |
1. Conversation ID will be selected from LOV. 2. The updated conversation ID cannot be amended. |
1. Conversation ID attached in the main page gets defaulted here. |
Defaults to Branch walk in customer ID. |
“All roles” for the branch selected. |
1. Once the customer id is created for the prospect branch walk in id will be replaced with the newly created customer id. |
5. Conversation has begun before the origination is started. 6. Conversation is begun during origination. |
Customer |
1. Conversation ID sent by channel gets updated here. 2. The updated conversation ID cannot be amended. |
1. Conversation ID sent by channel gets updated here. |
Existing Customer Id will be defaulted. |
Default to Help Desk |
1. Once the branch is chosen by the prospect the conversation will be assigned to the “All Roles” for that branch. |
7. Conversation is not started in the channel; it has been started by the branch user during any stage in origination. |
Customer |
1. Auto generated conversation ID gets updated here. 2. The updated conversation ID cannot be amended. |
1. Conversation ID will be auto generated. |
Existing Customer Id will be defaulted. |
“All roles” for the branch selected. |
- |
8. Conversation is created out of the origination flow and attached to origination |
Customer |
1. Conversation ID will be selected from LOV. 2. The updated conversation ID cannot be amended. |
1. Conversation ID attached in the main page gets defaulted here. |
Existing Customer Id will be defaulted. |
“All roles” for the branch selected. |
- |
For further details on the remaining fields refer "Example 2.7.1" on page 47 section in this chapter.
After viewing the details, if you want to obtain the missing documents before approval, then select the action ‘Obtain Missing Documents’ in the text box adjoining the ‘Audit’ button. You will be taken back to ‘Receive and Verify’ screen. However, if you want to proceed with the process of account creation, select the action ‘APPROVE’ in the text box adjoining the ‘Audit’ button. You will be taken to ‘Input Details’ task. Click save icon in the tool bar. The system displays the message ‘The task is completed successfully’.
Click ‘OK’ button in this screen. You will be taken back to the ‘Approve Account Opening’ screen. Click ‘Exit’ button to exit the screen. The task is then moved to the next activity.
You can publish the standard list of documentation for origination workflow process using ‘Document Verify Maintenance’ screen. The system facilitates retrieval of the document checklist defined for a process code that can be utilized by channels for originations.
You can also upload the required documents from channels at the time of application submission. Further document upload will be possible only when the outcome is selected as ‘Rejected’ in this and the application is redirected to application filling stage.
If the submitted application is rejected by the authorizer, then the request is redirected to the application filling stage.
The system stores the documents uploaded by the customer/prospect through the channel in the document management system. When the request is raised from the branch the documents uploaded will be stored in the document management system.
2.8 Modifying and Resubmit the Application
In this stage the Customer/Prospect can modify and resubmit the application if the Bank user rejects the application due to any reasons.
2.9 Input Details of Savings Account
In this stage the bank captures the complete details of the account opening form such as customer information (all applicants in case of joint accounts), contact details, accounts / services sought for, nominee details, guardian details (in case of minor accounts / nominees), details of initial deposit of the prospect / customer. The bank also uploads signature and photographs of the prospect / customer.
This section contains the following topics:
- Section 2.9.1, "Input Details"
- Section 2.9.2, "Capturing Main Details"
- Section 2.9.3, "Capturing Auxiliary Details"
- Section 2.9.4, "Capturing Nominee Details"
- Section 2.9.5, "Capturing Primary Customer Details"
- Section 2.9.6, "Capturing Secondary Customer Details"
- Section 2.9.7, "Capturing Tertiary Customer Details"
2.9.1 Input Details
Users belonging to the user role ROEROLE (Retail Operations Executive) can perform these activities.
Go to the pending list in the system. The system displays all the pending activities. Click ‘Acquire’ button adjoining the ‘Input Details’ task to acquire it. The system displays the information message as "..xxx Acquire Successful"
If you have requisite rights, double click on the task in your ‘Assigned’ task list and invoke the following screen:
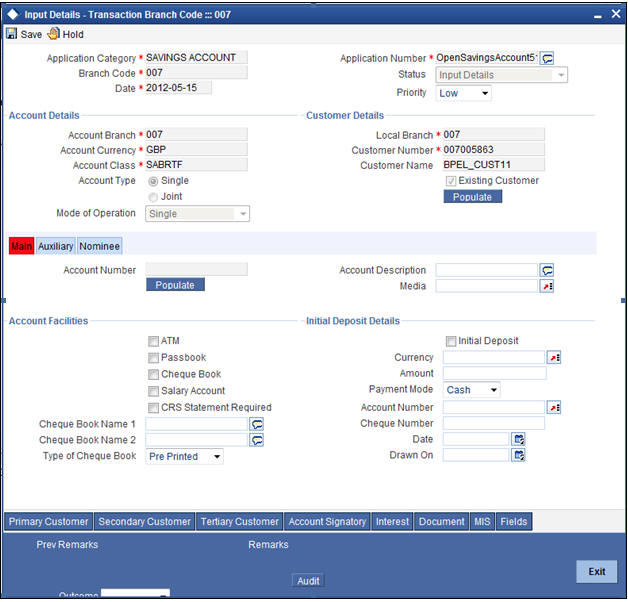
2.9.2 Capturing Main Details
For further details on the fields displayed on this screen, refer to the section ‘Section 2.7.2, "Origination Initiated by External Channels"’ in this chapter.
2.9.3 Capturing Auxiliary Details
Click on ‘Auxiliary’ tab to specify the following details:
For further details on the fields displayed on this screen, refer to the section ‘"Example 2.7.3" on page 51’ in this chapter.
2.9.4 Capturing Nominee Details
Click on ‘Nominee’ tab to specify the following details:
For further details on the fields displayed on this screen, refer to the section ‘"Example 2.7.4" on page 52’ in this chapter.
2.9.5 Capturing Primary Customer Details
Click the ‘Primary Customer’ button to invoke the ‘Primary Customer Details’ screen. The screen is displayed below:
For further details on the fields displayed on this screen, refer to the section ‘Primary Customer Details’ in this chapter.
2.9.6 Capturing Secondary Customer Details
Click the ‘Secondary Customer’ button to invoke the ‘Secondary Customer Details’ screen. The screen is displayed below:
2.9.7 Capturing Tertiary Customer Details
Click the ‘Tertiary Customer’ button to invoke the ‘Tertiary Customer Details’ screen. The screen is displayed below:
For further details on the fields displayed on this screen, refer to the section ‘Primary Customer Details’ in this chapter.
Click the ‘Document’ button to invoke the ‘View Documents’ screen. The screen is displayed below:
In ‘Document Reference’ screen, you can maintain the document check list details which are defaulted from the main screen.
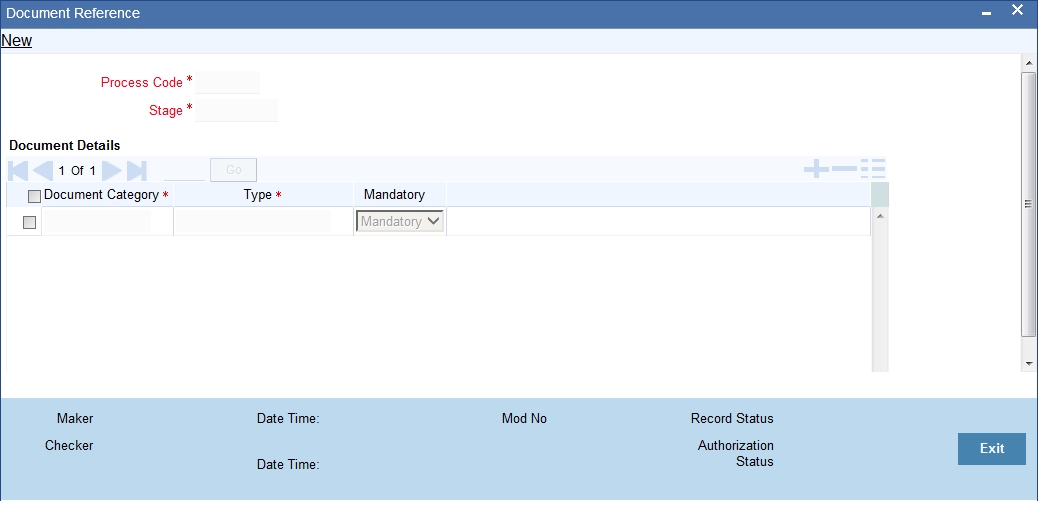
In this screen you can view the following document details:
- Document Category
- Document Type
- Mandatory
2.10 Verify Details of Savings Account
At this stage, you need to verify details for opening the account. Only users belonging to role ‘ROMROLE’ (Retail Operations Manager) will be able to perform this task. If you have the requisite rights, you can input details of a customer account using the ‘Input savings account details’ screen. To invoke this screen, you need to acquire the task from your ‘Pending’ task list.
In this stage the bank verifies all the details entered to ensure correctness of information captured. In case the details captured are incorrect, the bank needs to make the necessary modifications. If the verification is successful, the bank proceeds to conduct KYC checks.
The fields in the screen will be disabled and the verifier will be able to navigate to all the tabs and verify data entered / corrected. Also the verifier is allowed to enter comments.
To invoke this screen, you need to acquire the task from your ‘Pending’ task list.
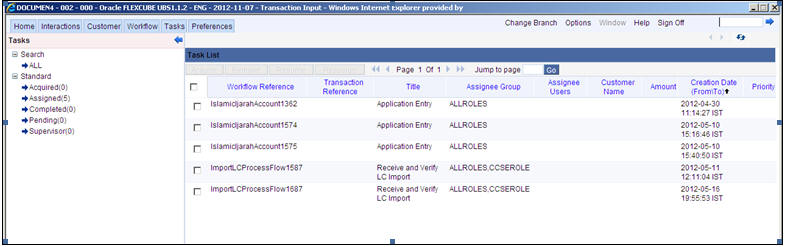
Select the desired record and click the adjoining ’Acquire’ button. The system displays the message ‘The task is completed successfully’.
The task will then be moved to your ‘Assigned’ task list. Double click on the record in your ‘Assigned’ task list. The following screen will be displayed.
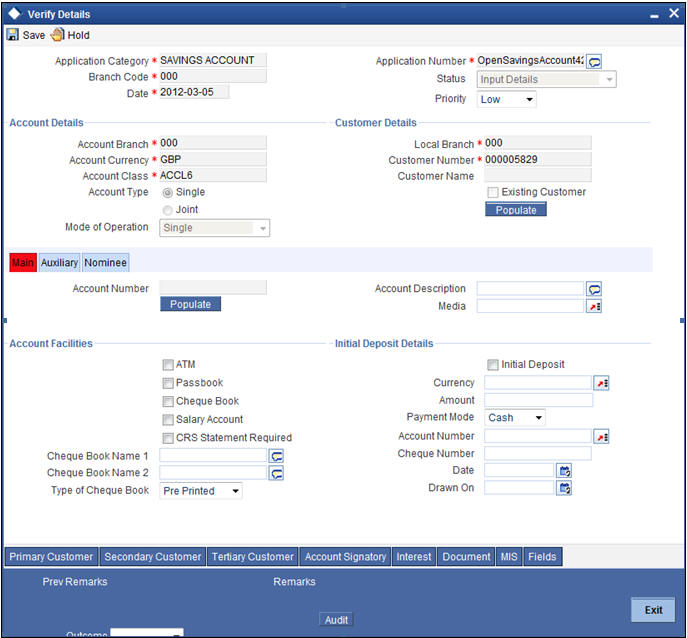
Here you can view the details captured. If the required documents have been verified, select the action ‘PROCEED’ in the text box adjoining the ‘Audit’ button. The process will move to ‘KYC_R’ task. If the verification has failed for some reason, then you will be taken ‘Modify Details’ task. Click save icon in the tool bar to save the record.
The system displays the message ‘Enter new customer details through Customer Information tab’.
Click the ‘OK’ button in this screen. You will be taken back to the ‘Verifying Details’ screen. Click ‘Exit’ button to exit the screen. The task is then moved to the next activity.
2.11 Modify Details of Savings Account
In this stage In case verification is not successful, the bank modifies the details captured.
Users belonging to the user role ROEROLE (Retail Operations Executive) can perform these activities.
In case verification is not successful, then you may need to modify few details. Go to the pending list in the system. The system displays all the pending activities. Click ‘Acquire’ button adjoining the required task to acquire it. The system displays the information message as "..xxx Acquire Successful"
If you have requisite rights, double click on the task in your ‘Assigned’ task list and invoke the following screen:
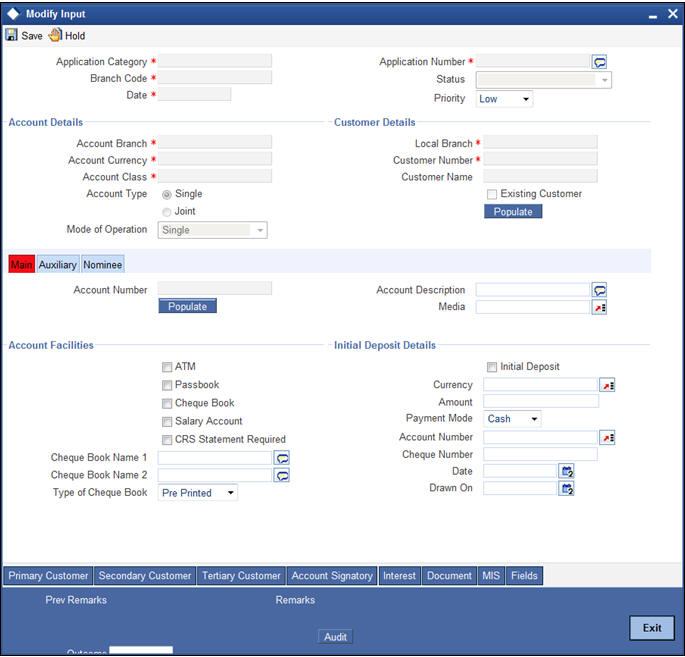
In this screen you can modify the editable fields. After modifying the required details, click save icon in the tool bar. You will be taken back to ‘Verify Details’ task. Click save icon in the tool bar to save the record.
The system displays the message ‘The task is completed successfully’.
Click the ‘OK’ button in this screen. You will be taken back to the ‘Modify Details’ screen. Click ‘Exit’ button to exit the screen. The task is then moved to the next activity
2.12 KYC_R Review Info
This process includes checks like SDN check, internal blacklist check, contact details verification, etc. The account is opened only when the customer passes all these checks. In case of non-clearance of any of the checks, the account opening process is terminated. The bank verifies all the details/documents to ensure that the information / documents required to carry out KYC checks are obtained. In case the details captured are incorrect, the bank makes the necessary modifications. If the verification is successful, the bank proceeds to conduct KYC checks. Once KYC checks are carried out, the result is passed on to the parent process.
If any of the checks fail, the relevant regulatory /internal authorities are informed. Once KYC checks are carried out, the result is passed on to the parent process.
Here you perform the Know Your Customer check on the customer. The KYC check depends upon the regulatory environment within which your bank operates and its internal KYC policies.
This section contains the following topics:
- Section 2.12.1, "KYC_R Review Process"
- Section 2.12.2, "Verify Prospect /Customer Details"
- Section 2.12.3, "Ascertain if KYC Checks are Required"
- Section 2.12.4, "SDN check"
- Section 2.12.5, "Verify SDN Match"
- Section 2.12.6, "Inform Regulatory / Internal Authorities on KYC Checks Failure"
- Section 2.12.7, "Internal Blacklist Check"
- Section 2.12.8, "Verify Customer / Prospect Contact Details"
- Section 2.12.9, "Other KYC Checks"
- Section 2.12.10, "KYC Decision"
2.12.1 KYC_R Review Process
Bank initiates the process of KYC-R review for a customer as a part of parent process with all the relevant information in the system. This process comprises the following stages:
- Verify prospect /customer details
- Ascertain if KYC checks are required
- SDN checks
- Verify SDN Match
- Inform Regulatory / Internal authorities on KYC checks failure
- Internal Black List check
- External KYC Check
- Retry KYC Check
- Verify customer / prospect contact details
- Other KYC Checks
- KYC Decision
2.12.2 Verify Prospect /Customer Details
Users belonging to the user role ‘KYCEROLE’ (KYC Executive) can perform these activities.
Go to the pending list in the system. The system displays all the pending activities. Click ‘Acquire’ button adjoining the ‘Sub-process KYC Review’ task to acquire it. The system displays the information message as "..xxx Acquire Successful"
If you have requisite rights, double click on the task in your ‘Assigned’ task list and invoke the following screen:
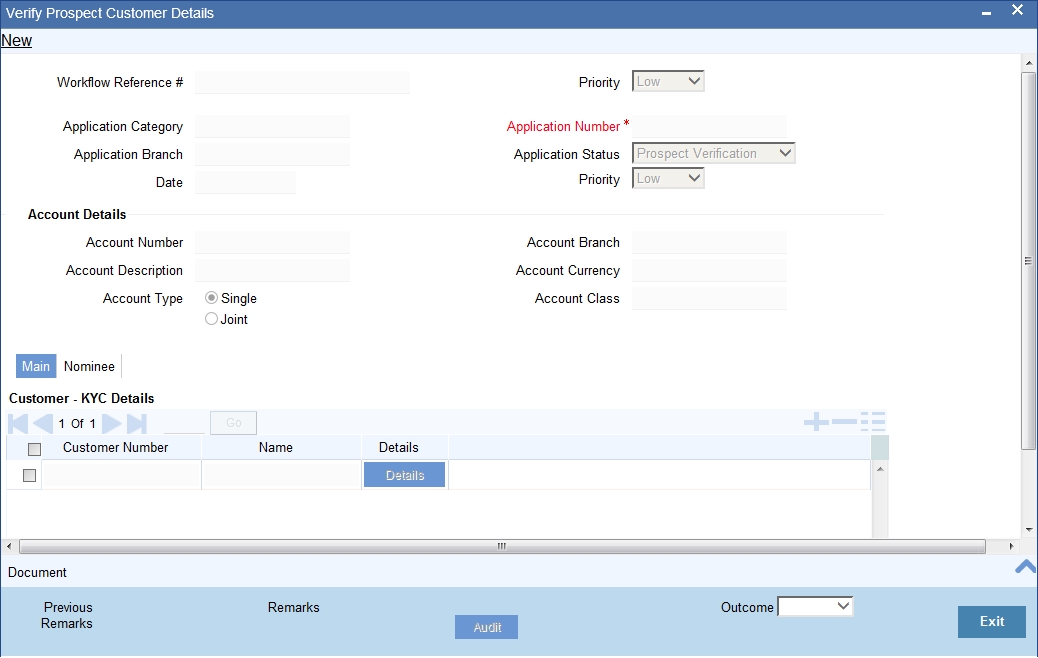
Click ‘Document’ button to invoke ‘Document Upload’ screen. The verifier will be able to update only remarks and upload documents that he might obtain in this stage.
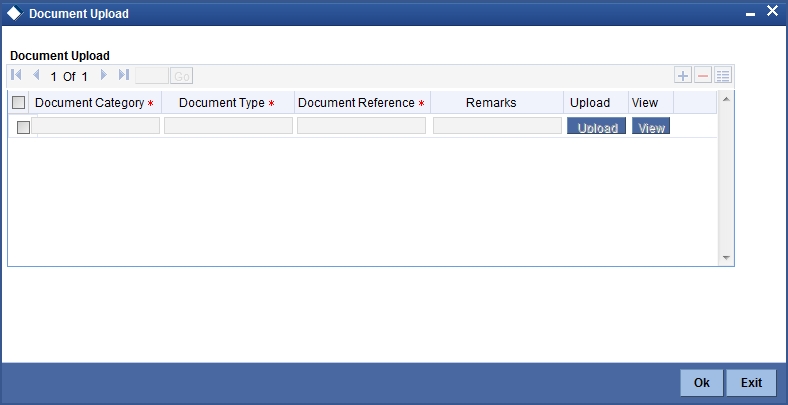
You can view the customer details in this screen. If the customer information is complete, then select the outcome as ‘COMPLETE’ and save the record by clicking the save icon in the tool bar.
The system displays the message ‘The task is completed successfully’.
Click ‘Ok’ button. You will be taken back to the ‘Verify Prospect Customer Details’ screen. Click ‘Exit’ button to exit the screen. The task is then moved to the next activity.
2.12.3 Ascertain if KYC Checks are Required
Users belonging to the user role ‘KYCMROLE’ (KYC Manager) can perform these activities.
In case of an existing customer, the bank checks if there are any changes to the existing KYC information already available with the bank. The KYC check for an existing customer is performed only if there are changes in the customer information (including details of nominee and mandate holder). In all other cases of new and existing customers, KYC checks are mandatory.
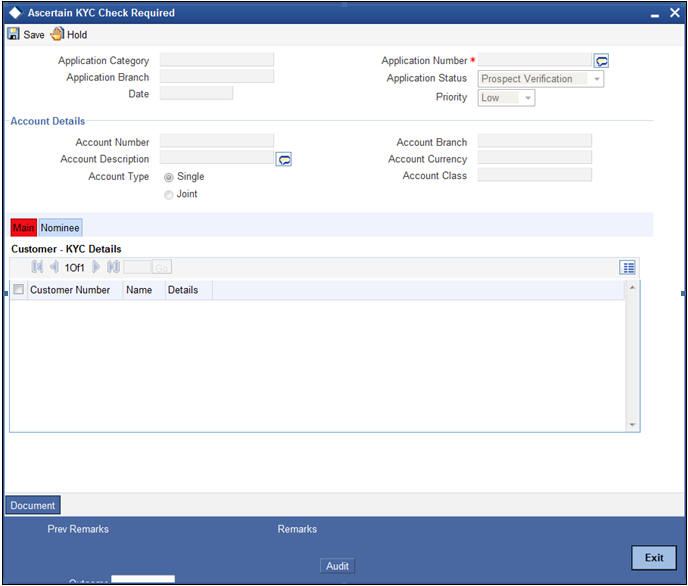
You can view the customer details in this screen. If the customer information is complete, then select the outcome as ‘REQUIRED’ and save the record by clicking the save icon in the tool bar.
The system displays the message ‘The task is completed successfully’.
Click ‘Ok’ button. You will be taken back to the ‘Ascertain KYC Check Required’ screen. Click ‘Exit’ button to exit the screen. The task is then moved to the next activity.
2.12.4 SDN check
In this stage, the bank checks the applicant’s name for terrorism-related black-listing against the SDN database maintained by the Office of Foreign Assets Control (OFAC). In case of a no match, the process proceeds. In case of a match (positive/partial), you can verify the match again using the OFAC guidelines.
A system Task is created which invokes the external service to do the SDN check for all new applicants and any existing customers whose information is modified. All nominee details are also sent for SDN check.
2.12.5 Verify SDN Match
The bank checks the applicant’s name for terrorism-related black-listing against the SDN database maintained by the Office of Foreign Assets Control (OFAC). In case of a no match, the process proceeds. In case of a match (positive/partial), you can verify the match again using the OFAC guidelines.
Users belonging to the user role ‘KYCMROLE’ (KYC Manager) can perform these activities.
Go to the pending list in the system. The system displays all the pending activities. Click ‘Acquire’ button adjoining the ‘Verify SDN Match’ task to acquire it. The system displays the information message as "..xxx Acquire Successful"
If you have requisite rights, double click on the task in your ‘Assigned’ task list and invoke the following screen:
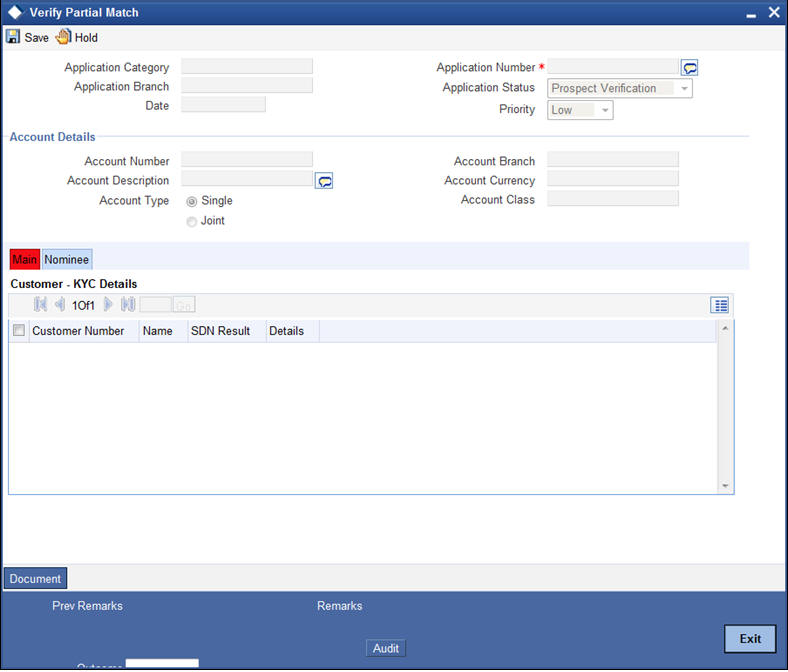
In this screen, you can view the applicant’s details. In case of a positive SDN match, the bank informs the regulatory agency (OFAC or any other similar agency) about the SDN match of the prospect/customer. However, if the match is cleared, you can continue with the subsequent KYC checks. Select the outcome as ‘NO MATCH’ and save the record by clicking the save icon in the tool bar.
The system displays the message ‘The task is completed successfully’.
Click ‘Ok’ button. You will be taken back to the ‘Verify Partial Match’ screen. Click ‘Exit’ button to exit the screen. The task is then moved to the next activity.
2.12.6 Inform Regulatory / Internal Authorities on KYC Checks Failure
In case of a positive SDN match, the bank informs the regulatory agency (OFAC or any other similar agency) about the SDN match of the prospect/customer. The bank may also inform its internal authorities in case of positive SDN match and/or if the prospect/customer is blacklisted internally.
Users belonging to the user role ‘KYCMROLE’ (KYC Manager) can perform these activities.
Go to the pending list in the system. The system displays all the pending activities. Click ‘Acquire’ button adjoining the ‘Inform Regulatory Authorities’ task to acquire it. The system displays the information message as "..xxx Acquire Successful"
If you have requisite rights, double click on the task in your ‘Assigned’ task list and invoke the following screen:
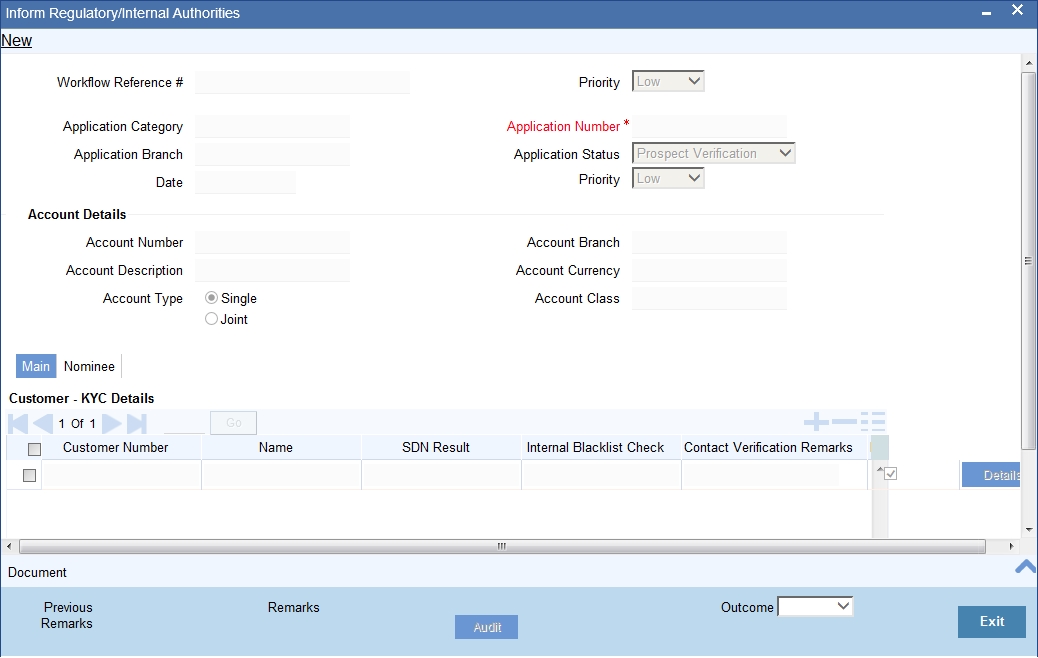
In this screen, you can view all the details of the applicant. Even the KYC check details are also displayed here.
Select the outcome as ‘PROCEED’ and save the record by clicking the save icon in the tool bar.
The system displays the message ‘The task is completed successfully’.
Click ‘Ok’ button. You will be taken back to the ‘Inform Regulatory Authorities’ screen. Click ‘Exit’ button to exit the screen.
2.12.7 Internal Blacklist Check
Users belonging to the user role ‘KYCEROLE’ (KYC Executive) can perform these activities.
Go to the pending list in the system. The system displays all the pending activities. Click ‘Acquire’ button adjoining the ‘Internal Blacklist Check’ task to acquire it. The system displays the information message as "..xxx Acquire Successful"
If you have requisite rights, double click on the task in your ‘Assigned’ task list and invoke the following screen:
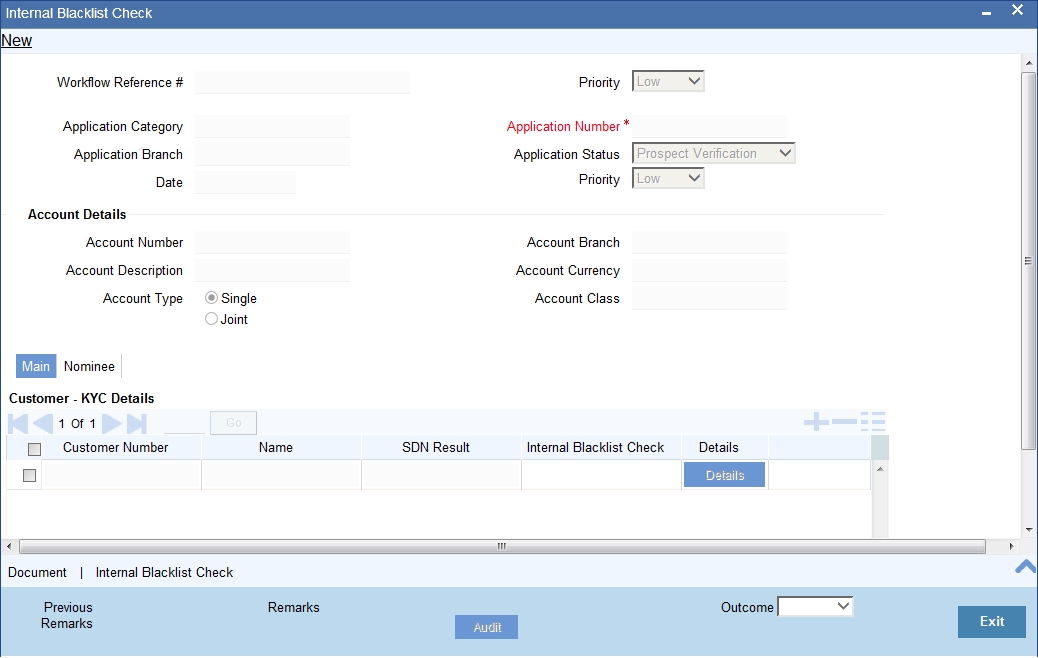
Click ‘Int. BlackList Check’ button to invoke ‘Blacklist Check’ screen. The verifier will be able to update only remarks and upload documents that he might obtain in this stage.
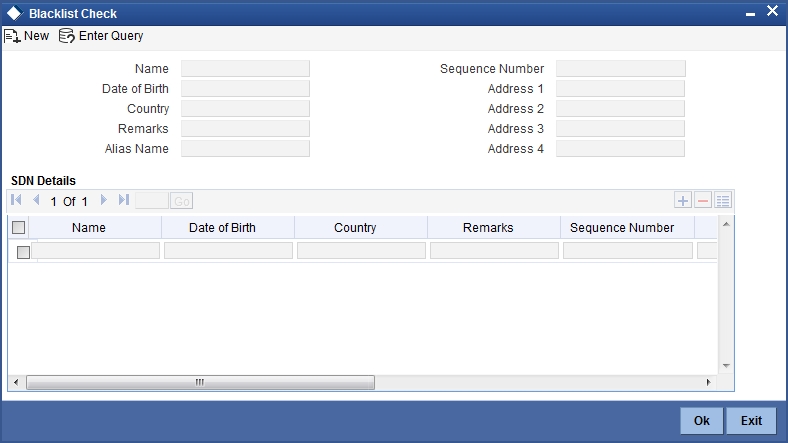
In this screen, you can view the applicant’s details. If the applicant’s name is listed in the bank's internal list of global blacklisted customers, you can report it to the internal authorities of the bank. You can continue with the process of creating account only when the customer passes these checks. Select the outcome as ‘PROCEED’ and save the record by clicking the save icon in the tool bar.
The system displays the message ‘The task is completed successfully’.
Click ‘Ok’ button. You will be taken back to the ‘Internal Blacklist Checks’ screen. Click ‘Exit’ button to exit the screen. The task is then moved to the next activity.
2.12.8 Verify Customer / Prospect Contact Details
Users belonging to the user role ‘KYCEROLE’ (KYC Executive) can perform these activities.
Go to the pending list in the system. The system displays all the pending activities. Click ‘Acquire’ button adjoining the ‘Internal Blacklist Check’ task to acquire it. The system displays the information message as "..xxx Acquire Successful"
If you have requisite rights, double click on the task in your ‘Assigned’ task list and invoke the following screen:
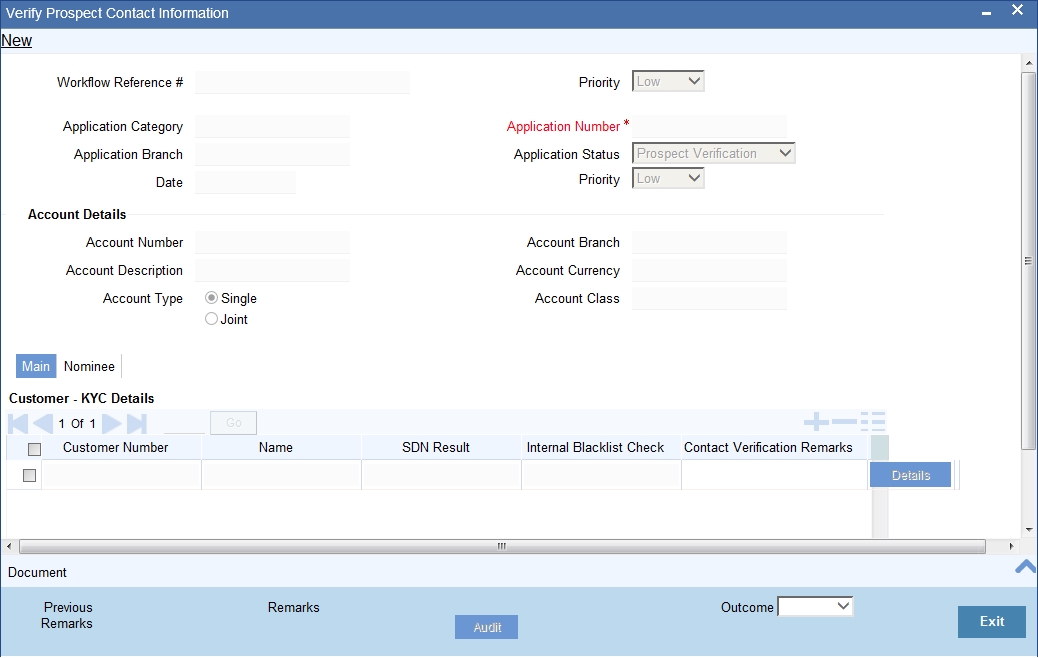
In this screen, you can view the applicant’s details. As per the bank’s mandated policy, you will have to perform the customer identification check. This involves verification of customer address, phone number etc. You can enter the outcome of various stages in the Audit block for the verifier to make a decision. After verification, select the outcome as ‘PROCEED’ and save the record by clicking the save icon in the tool bar.
The system displays the message ‘The task is completed successfully’.
Click ‘Ok’ button. You will be taken back to the ‘Verify Prospect Contact Details’ screen. Click ‘Exit’ button to exit the screen. The task is then moved to the next activity.
2.12.9 Other KYC Checks
As per the bank’s mandated policy, you will have to other details like verification of the employer information, verification of the income information, sources and uses of funds etc.
Users belonging to the user role ‘KYCEROLE’ (KYC Executive) can perform these activities.
Go to the pending list in the system. The system displays all the pending activities. Click ‘Acquire’ button adjoining the ‘OtherKYCChecks’ task to acquire it. The system displays the information message as "..xxx Acquire Successful"
If you have requisite rights, double click on the task in your ‘Assigned’ task list and invoke the following screen:
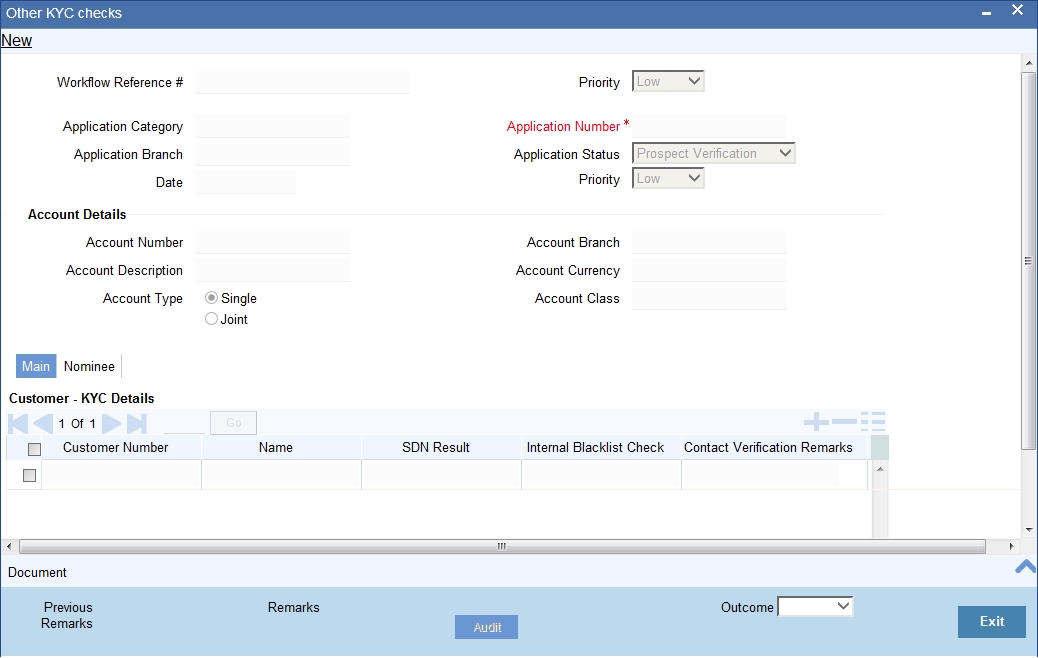
In this screen, you can view and verify the applicant’s details. After verifying the details, select the outcome as ‘PROCEED’ and save the record by clicking the save icon in the tool bar.
The system displays the message ‘The task is completed successfully’.
Click ‘Ok’ button. You will be taken back to the ‘Other KYC Checks’ screen. Click ‘Exit’ button to exit the screen. The task is then moved to the next activity.
2.12.10 KYC Decision
After verifying and evaluating the KYC information, bank decides whether it should enter into a relationship with the prospect/continue relationship (in case of an existing relationship) or not.
Users belonging to the user role ‘KYCMROLE’ (KYC Manager) can perform these activities.
Go to the pending list in the system. The system displays all the pending activities. Click ‘Acquire’ button adjoining the ‘KYCDecision’ task to acquire it. The system displays the information message as "..xxx Acquire Successful"
If you have requisite rights, double click on the task in your ‘Assigned’ task list and invoke the following screen:
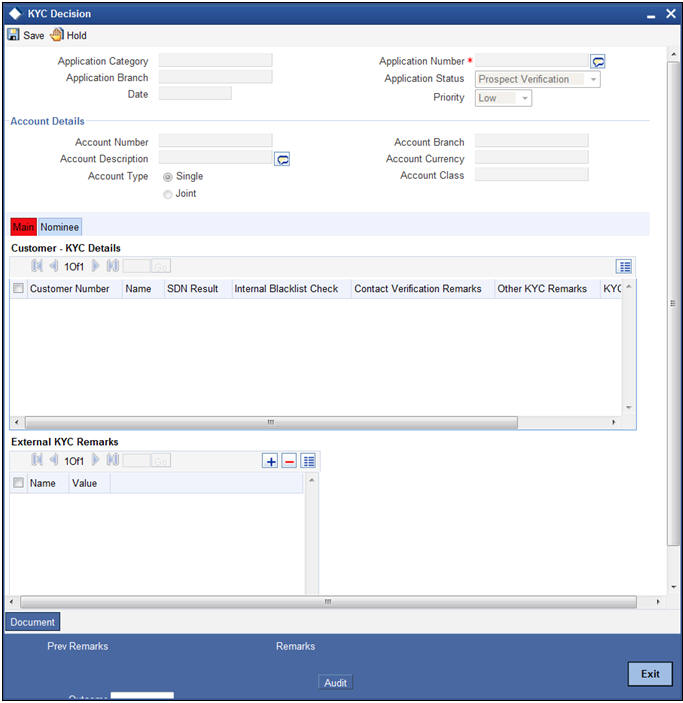
In this screen, you can view the complete information of the applicant. The outcome of various stages of KYC-R sub process is displayed in the Audit block. Based on these information, you can inform the customer if you enter into a relationship with the prospect/continue relationship (in case of an existing relationship) or not as part of the parent process.
Based on the decision, select the outcome as ‘FAILED’ or ‘PASSED’ and save the record by clicking the save icon in the tool bar.
The system displays the message ‘The task is completed successfully’.
Click ‘Ok’ button. You will be taken back to the ‘KYC Decision’ screen. Click ‘Exit’ button to exit the screen. The task is then moved to the Main process.
2.13 Block Customer in the System
For an existing customer if the KYC check fails, then the system will block all the existing accounts for the customer as per the bank's internal guidelines. The failed customers will be added into the internal backlist database.
2.14 Notify Customer on Negative Status of KYC Checks
Users belonging to the user role ‘ROEROLE’ (Retail Operations Executive) can perform these activities.
In case, a customer does not clear KYC checks, then you can terminate the account opening process after notifying the customer. If you have requisite rights, double click on the task in your ‘Assigned’ task list and invoke the following screen:
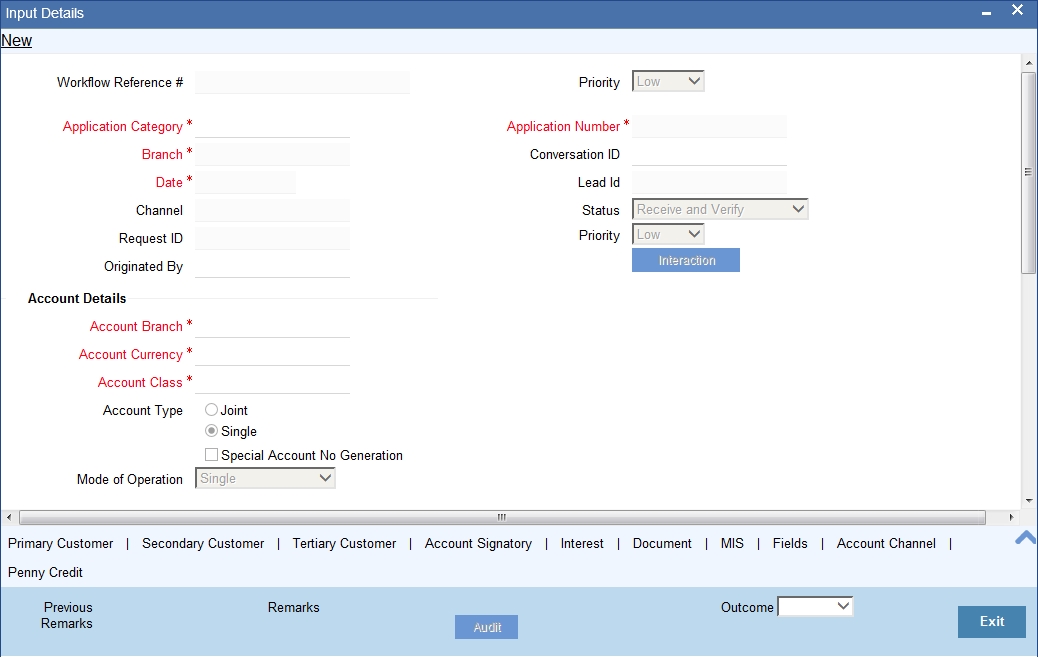
In this screen you can view the account and the customer details. After intimating the customer about the failed KYC checks, you can terminate the account creation process.
2.15 Modify Penny Credit Details
In this stage, if there is a rejection of penny credit transaction, then on need basis Bank will allow modification of penny credit details to re-initiate the transaction.
2.16 Validate Penny Credit Details
In this stage, the penny credit amount sent by the bank will be cross verified with the prospect based on the amount credited in prospect's external bank account. If the Customer fails to enter the penny credit time for specified time period or if the customer fails to wrong penny credit amount, then the account creation will fail.
2.17 Create / Modify Customer Details in Oracle FLEXCUBE
If the applicant is a new customer, then a new customer record is created in the system. In case of an existing customer, the customer's KYC information is updated. Similarly, if a joint account is opened where multiple customer IDs need to be created/updated, then the same is done in the system as part of this activity.
2.18 Create Account
The system creates a customer account at this stage. In case of a joint account, the entire applicable customers IDs are linked to the account.
2.19 Store document reference in Oracle FLEXCUBE
The customer and account details captured are stored in the system for further reference.
2.20 Check Available Balance
Users belonging to the role ‘ROEROLE’ (Retail Operations Executive) will be able to perform this task.
If initial deposit is required, then you have to check the available balance. For this, go to the pending list and Click ‘Acquire’ button adjoining the ‘Check if Balance Available’ task to acquire it. The system displays the information message as "..xxx Acquire Successful"
If you have requisite rights, double click on the task in your ‘Assigned’ task list and invoke the following screen
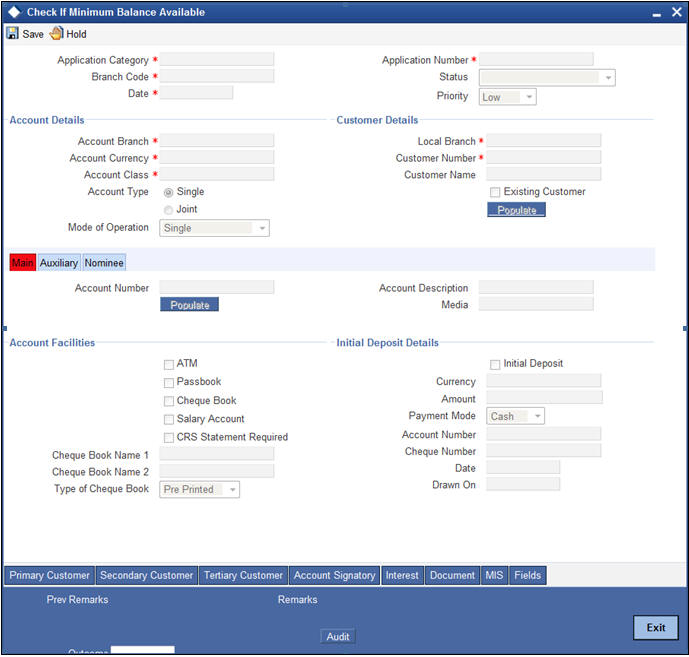
You can view the available balance in this screen. If the balance is sufficient, select the action ‘PROCEED’ from the drop-down list adjoining the ‘Audit’ button. Click ‘Save’ icon in the tool bar to save the record.
The system displays the message ‘The task is completed successfully’.
Click the ‘OK’ button in this screen. You will be taken back to the ‘Check Available Balance’ screen. Click ‘Exit’ button to exit the screen. The task is then moved to the next activity.
2.21 Generate Cheque Book
Users belonging to the user role ‘ROEROLE’ (Retail Operations Executive) can perform these activities.
If the customer has opted for personalized cheque book, then go to the pending list and Click ‘Acquire’ button adjoining the ‘Generate Cheque Book’ task to acquire it. The system displays the information message as "..xxx Acquire Successful"
If you have requisite rights, double click on the task in your ‘Assigned’ task list and invoke the following screen:

The following details are displayed in this screen:
- Workflow reference number
- Priority
- Customer name
- Account number
Cheque Leaves From
Enter the starting cheque leaf number.
No. of Check Leaves
Enter the number of leaves to be generated.
Select the action ‘PROCEED’ in the text box adjoining the ‘Audit’ button in this screen and save the record by clicking the save icon in the tool bar.
The system displays the message ‘The task is completed successfully’.
Click the ‘OK’ button in this screen. You will be taken back to the ‘Generate Cheque Book’ screen. Click ‘Exit’ button to exit the screen. The task is then moved to the next activity i.e. delivery account kit to the customer.
2.22 Retrieve Pre-printed Cheque Book
Users belonging to the user role ‘RBOEROLE’ (Retail Branch Operations Executive) can perform these activities.
If initial deposit is not required and if the customer has opted for pre-printed cheque book, then go to the pending list and click ‘Acquire’ button adjoining the ‘Retrieve Pre-printed Cheque Book’ task to acquire it. The system displays the information message as "..xxx Acquire Successful"
If you have requisite rights, double click on the task in your ‘Assigned’ task list and invoke the following screen:
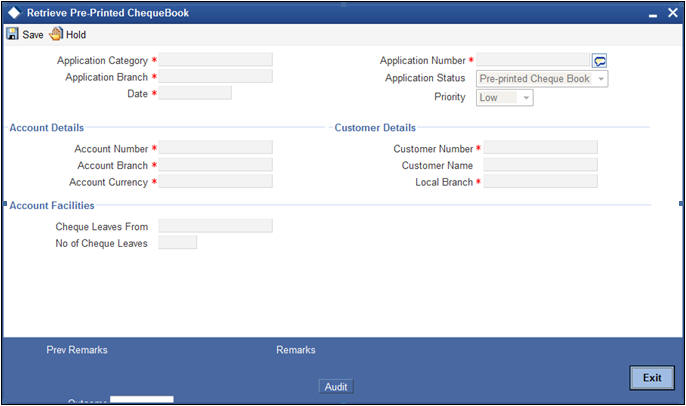
In this screen, the following details are displayed:
- Workflow reference number
- Priority
- Customer Name
- Account Number
Account Facilities
Enter the following details in this section:
Cheque Leaves From
Enter the starting cheque leaf number of the cheque book which you want to retrieve.
No. of Check Leaves
Enter the number of leaves to be retrieved.
Select the action ‘PROCEED’ in the textbox adjoining the ‘Audit’ button in this screen and save the record by clicking the save icon in the tool bar.
The system displays the message ‘The task is completed successfully’.
Click the ‘OK’ button in this screen. You will be taken back to the ‘Retrieve Pre-printed Cheque Book’ screen. Click ‘Exit’ button to exit the screen. The task is then moved to the next activity i.e. delivery account kit to the customer.
2.23 Issue Debit Card
In this stage, if the customer has opted for debit card, the required details are maintained and debit card will be issued to customer.
Details entered here are handed off to Debit card request tab in Customer Account Maintenance screen and debit card request is processed automatically.
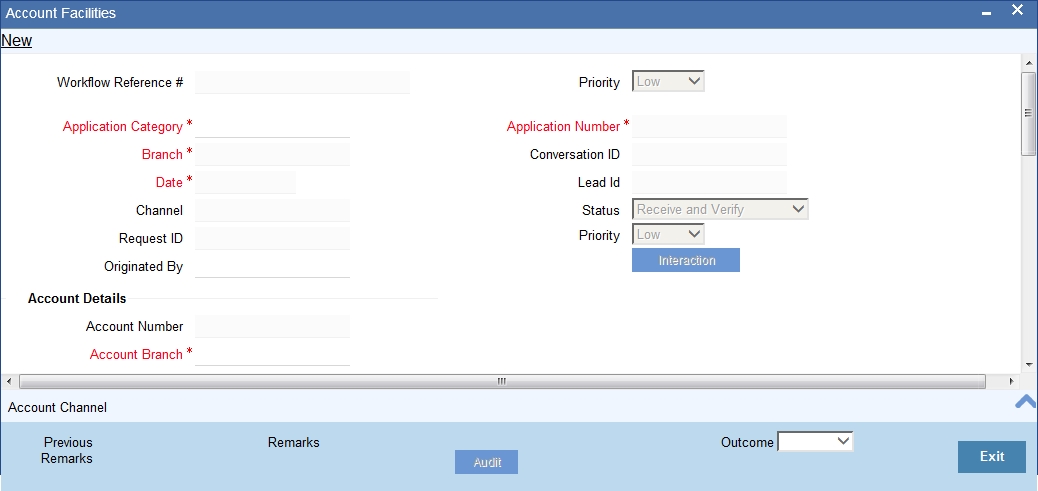
You need to maintain the following details:
Debit Card Details
Name On Card
Specify the name the customer prefers to be displayed on the card.
Card BIN
Specify the card BIN. The adjoining option list displays all valid card BIN available in the system. Select the appropriate one.
Request Reference Number
Specify the reference number of the request.
Card Number
Specify the card number.
Card Products
Specify a valid card product provided to the customer. The adjoining option list displays all valid card products available in the system. Select the appropriate one.
Card Application Date
Specify the date on which the application requesting for card was received, from the adjoining calendar icon.
Card Status
The system displays the status of the card.
2.24 Generate Welcome / Thank You Letter
As part the account opening kit, you should generate welcome/thank you letter. You can generate the letter from the system. The system generates the letter in a pre-defined format by picking up the name and other details of the customer maintained in the system.
2.25 Notify the customer/prospect about the successful account opening with details
In this stage, Customer/Prospect will be notified about the successful account opening with account number and details.
2.26 Deliver Account Kit to the Customer
Users belonging to the user role ‘ROEROLE’ (Retail Operations Executive) can perform these activities.
Go to the pending list in the system. The system displays all the pending activities. Click ‘Acquire’ button adjoining the ‘Deliver Customer Kit’ task to acquire it. The system displays the information message as "..xxx Acquire Successful"
If you have requisite rights, double click on the task in your ‘Assigned’ task list and invoke the following screen:
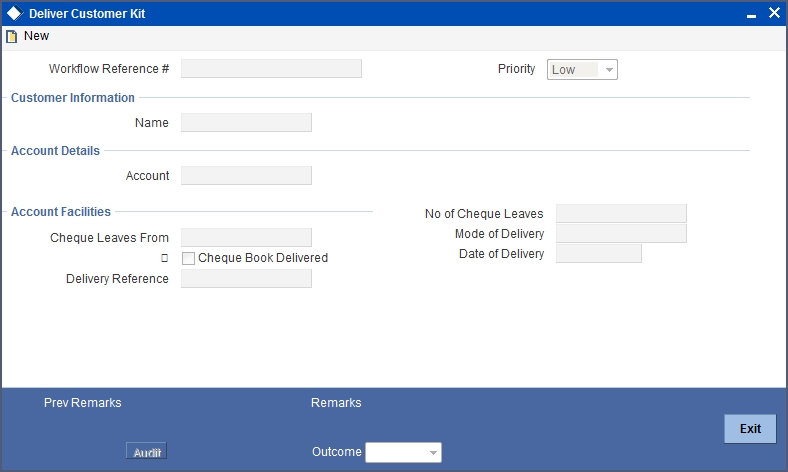
The account kit includes product features, welcome/thanks letter, cheque book (if applicable).
The following details are displayed in this screen:
- Workflow number
- Customer Name
- Account Name
- Priority
Account Facilities
The following details of the delivery kit can be captured here:
Cheque Leaves From
Specify the starting cheque leaf number.
No. of Cheque Leaves
Specify the number of cheque leaves provided to the customer.
Cheque Book Delivered
Check this field to indicate that the cheque book is delivered to the customer.
Delivery Ref. No.
Capture the delivery reference number.
Mode of Delivery
Indicate the mode of delivery of the account opening kit.
Date of Delivery
Mention the date on which the account opening kit was delivered.
Select the action ‘PROCEED’ in the textbox adjoining the ‘Audit’ button in this screen and save the record by clicking the save icon in the tool bar.
The system displays the message ‘The task is completed successfully’.
Click the ‘OK’ button in this screen. You will be taken back to the ‘Delivery Customer Kit’ screen. Click ‘Exit’ button to exit the screen. The task is then moved to the next activity i.e storing documents.
2.27 Store Documents
You can store the savings account opening form and other supporting documents are stored in a safe and accessible location. This storage information can be recorded using ‘Store Documents’ screen. You can capture the storage details in this stage.
Users belonging to the role ‘RBOEROLE’ (Retail Branch Operations Executive) will be able to perform this task.
Click ‘Acquire’ button adjoining the ‘Store Documents’ task to acquire it. The system displays the information message as "..xxx Acquire Successful"
If you have requisite rights, double click on the task in your ‘Assigned’ task list and invoke the following screen.
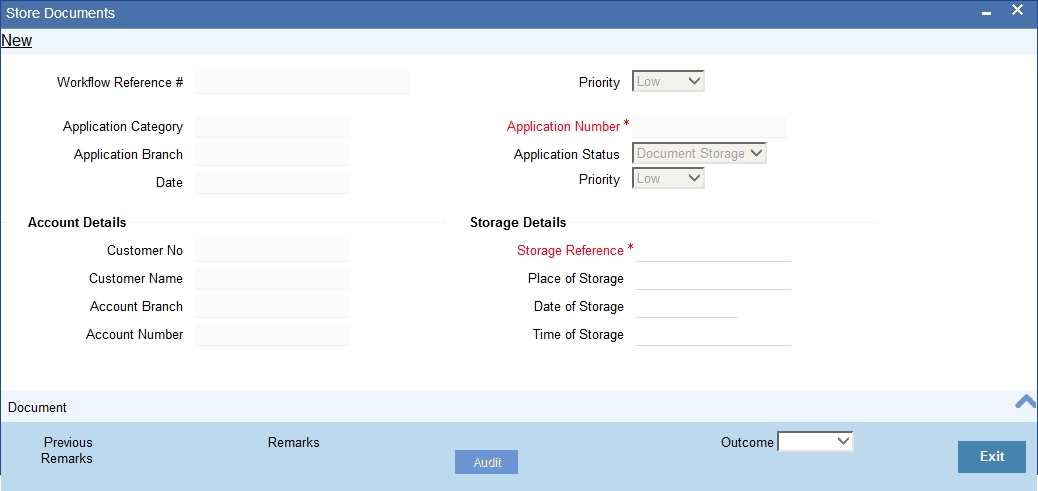
In this screen the following information can be stored:
Priority
Select the priority for maintaining the documents.
Customer Information
The following customer information is displayed:
- Customer Name
- Customer Number
Account Details
The account number of the customer is displayed.
Storage Details
Capture the following storage details in this section:
Date Of Storage
Capture the date of storing the documents.
Time Of Storage
Specify the time of storing the documents of the savings account.
Place Of Storage
Mention the place where the document is stored.
Storage Ref. Number
Specify the storage reference number.
Select the action ‘Document Stored’ in the textbox adjoining the ‘Audit’ button in this screen and save the record by clicking the save icon in the tool bar.
The system displays the message ‘The task is completed successfully’.
Click ‘Ok’ button. You will be taken back to the ‘Store Documents’ screen. Click ‘Documents’ button to view the documents stored. The following screen is displayed: